


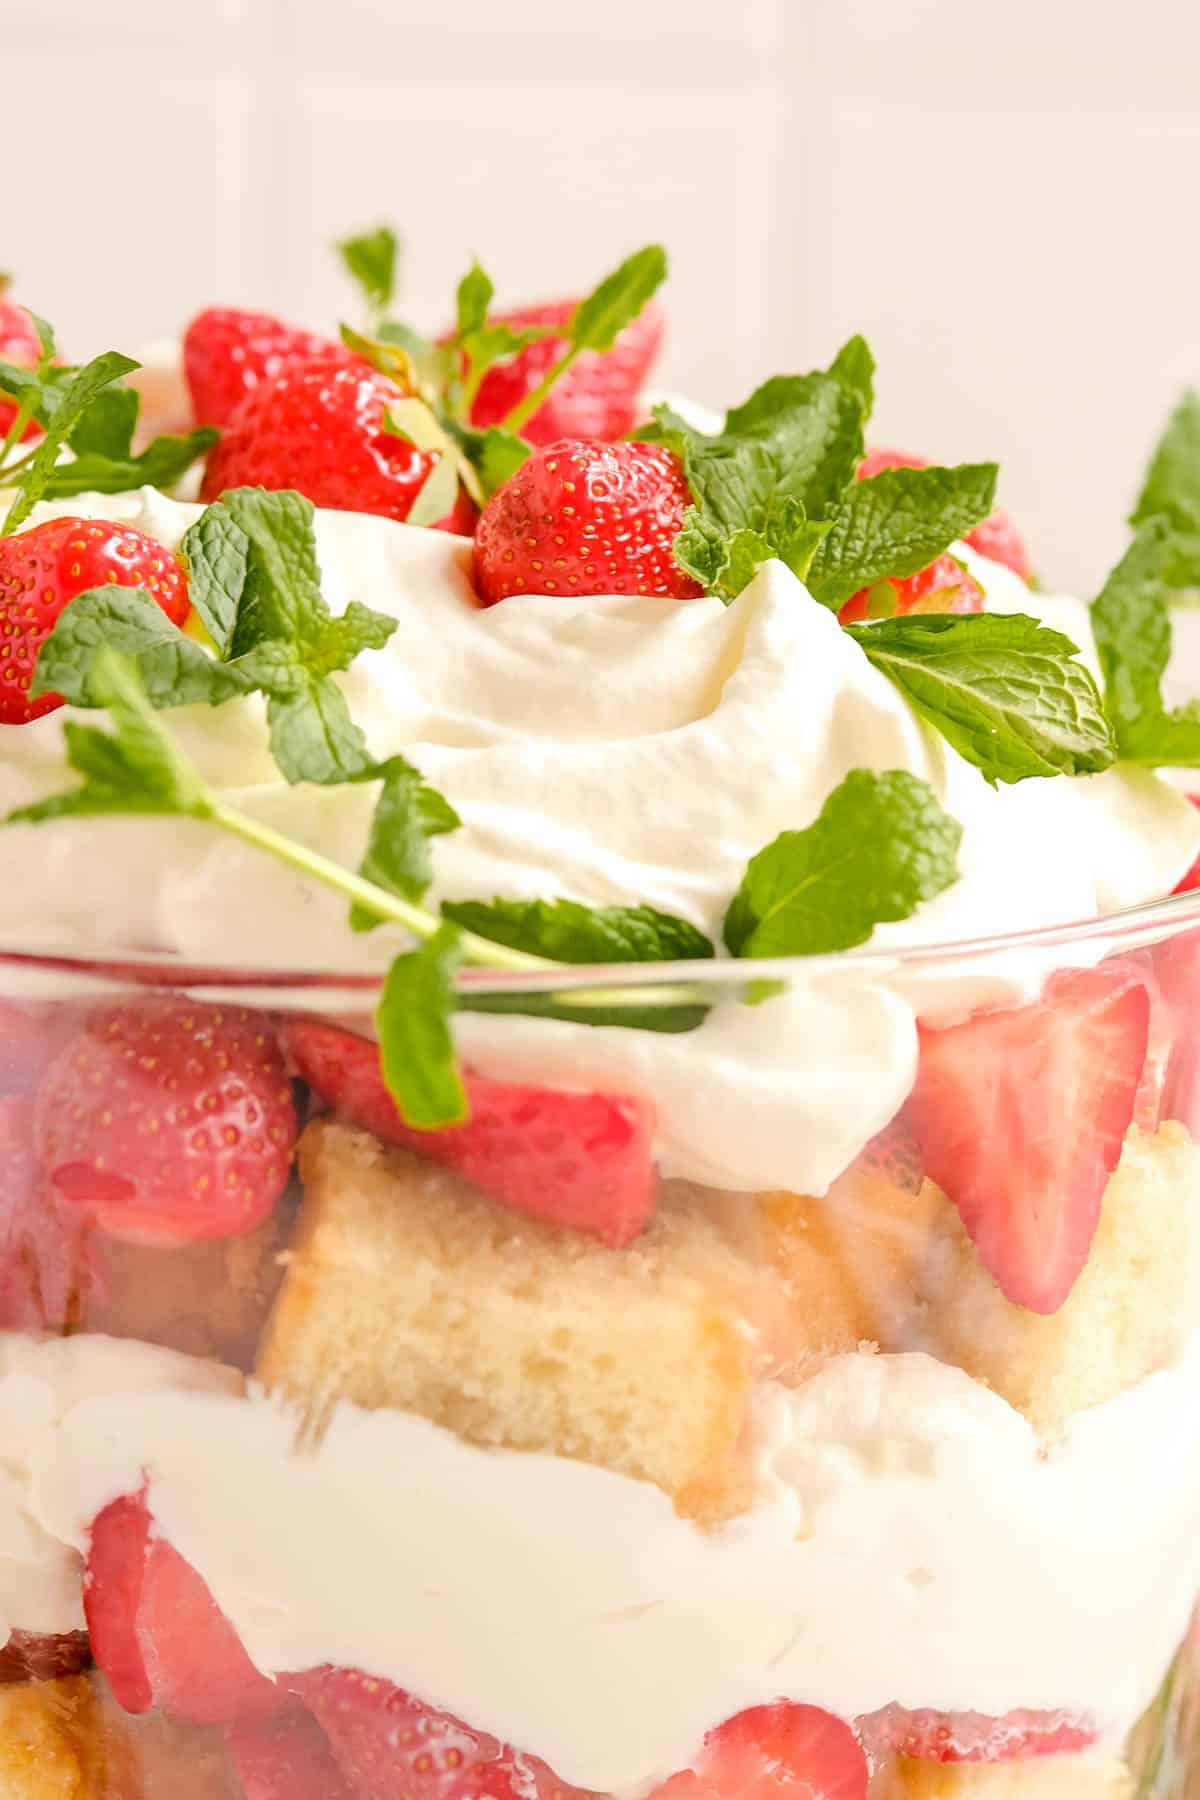
This homemade strawberry trifle recipe packs a summery punch with loads of fresh berries and a fresh mint simple syrup. As the perfect compliment to its summer flavors, it has the lightest texture thanks to the homemade whipped cream and airy sponge cake all layered up for a presentation that's sure to impress!
Jump to (scroll for more!):
- A brief history of trifle...
- Why this recipe leads to sweet success...
- Ingredient lessons for better baking...
- All about "ribbon" stage eggs...
- Special tools and equipment you'll need...
- How to make this trifle recipe...
- Let's stack it up: time-lapse assembly VIDEO!
- Fun ways to make this recipe your own...
- *Expert Tips and Tricks* for making the tastiest trifle...
- Other recipes fans of this berry trifle will love:
- 📖 Full Recipe
- Comments
A brief history of trifle...
Trifle is a classic british dessert that dates all the way back to the 16th century. In it's most basic form, it's layers of soaked sponge cake, fruit/jam, and custard/whipped cream in a "trifle dish" made just for showing off the beautiful layers of this classic treat (source: Encyclopedia Brittanica).
This take on trifle is a treat you can make year-round, but it's especially enjoyable in the summer during strawberry-picking season. With a classic genoise sponge cake, soaked in fresh mint-infused simple syrup, and layered up with those fresh strawberries and homemade whipped cream, this dessert comes second to none for a refreshingly sweet finish to any meal.
Why this recipe leads to sweet success...
There are a few golden nuggets of baking knowledge that will help you bake your way through this recipe with confidence every step of the way.
- How to make a classic sponge: sponge cake is one of the most classic recipes there is, but people can be intimidated by not knowing what "ribbon" stage is, or how to properly fold in flour to make sure your batter doesn't go flat. Well I'm here to help! The basic process is whip the eggs, add in the sugar, fold in the flour, then stir in the butter. With detailed instruction, process photos, and a mini video tutorial too, I'll show you exactly what to do every step of the way.
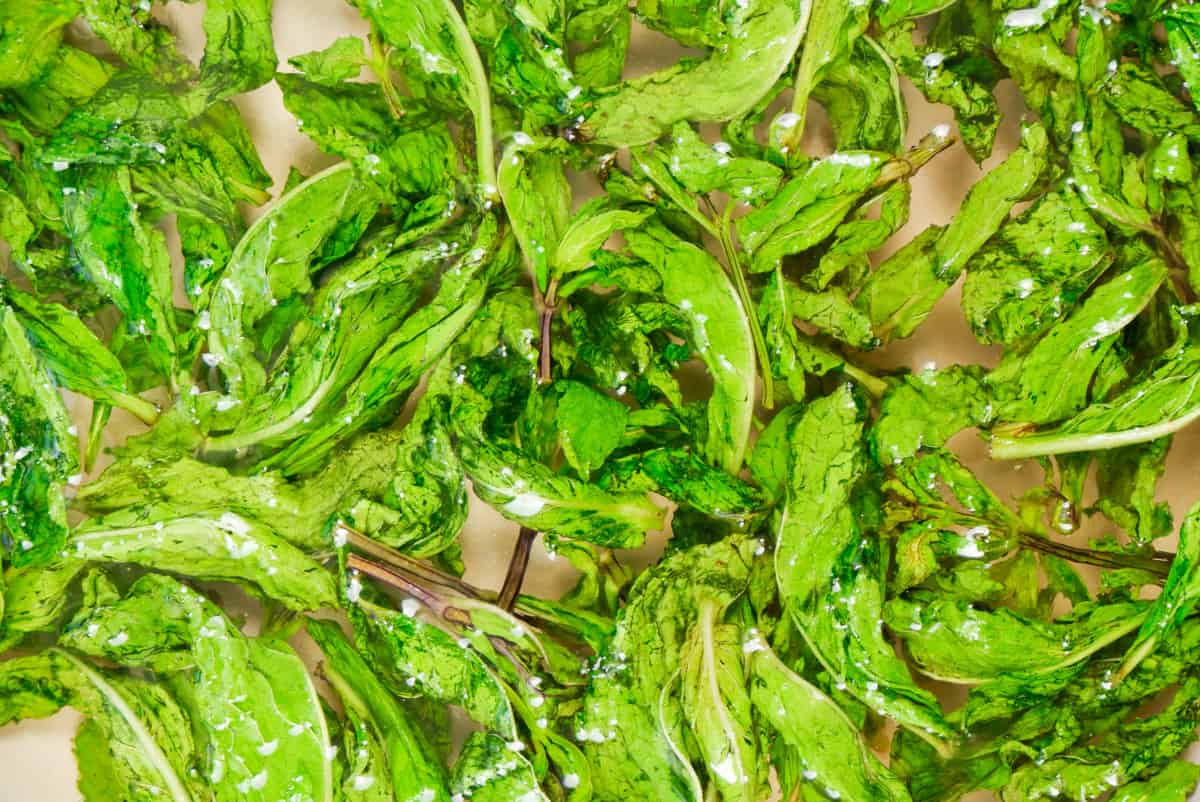
- Fresh mint is the best mint: fresh mint is one of my all time faaaaavorite flavors. But it's also one of the hardest flavors to translate into a recipe as the leaves themselves often aren't super appetizing in your dough, batter, syrup, etc. So how do we solve this? Through infusion! Infusion is essentially allowing the leaves to sit in a liquid for an extended period of time, so that liquid can extract their flavor. Our Mint Simple Syrup recipe does just that. Make sure you prepare it at least a day (or even a few days) ahead of time so it's ready for your freshly baked cake.
- Trifle is best served fresh: there are a number of fillings you can use for a trifle, many of which are stabilized and will keep for a few days. But for a lighter take on the classic custard filling, we're using whipped cream here. Because we're whipping it fresh, there are no stabilizers and it won't hold up very well as leftovers. Therefore, I recommend preparing your syrup-soaked cake, sliced strawberries, and whipping cream measurements as far in advance as you like on the day of service. However, hold off on whipping your cream until you're ready to assemble the trifle, no more than an hour or so before service for maximum enjoyment.
Ingredient lessons for better baking...
(Pssst…if you're ready to just get baking, get all the details in the recipe card below!)
- Mint Simple Syrup: this recipe was so tasty and so versatile, we gave it it's own post! Check out our simple syrup post, for all the details on how to make this delicious cake soak that will take your trifle to another level.
- Cornstarch: I know it's tempting to leave this out as it seems like just a tablespoon couldn't do much, but the starch really helps stabilize and tenderize this delicate batter. An easy way to think about cornstarch in cake recipes is all-purpose flour + cornstarch = faux cake flour. (This is what makes our delicious Donut Muffins so light and fluffy too!)
- Fresh strawberries: you definitely want to use fresh (not frozen) strawberries for this recipe as they really are the star of the show. The 5 cups you'll need is about 2 pints of strawberries (2 pounds), cleaned and chopped. This recipe is also perfect for fresh-picked strawberries: it'll help you use up a lot of them, but make sure that you get maximum enjoyment out of their freshness!
All about "ribbon" stage eggs...
While most people are familiar with whipping egg whites, many have never whipped whole eggs. The good news is - it's exactly the same process! The visual cues are just a little different.
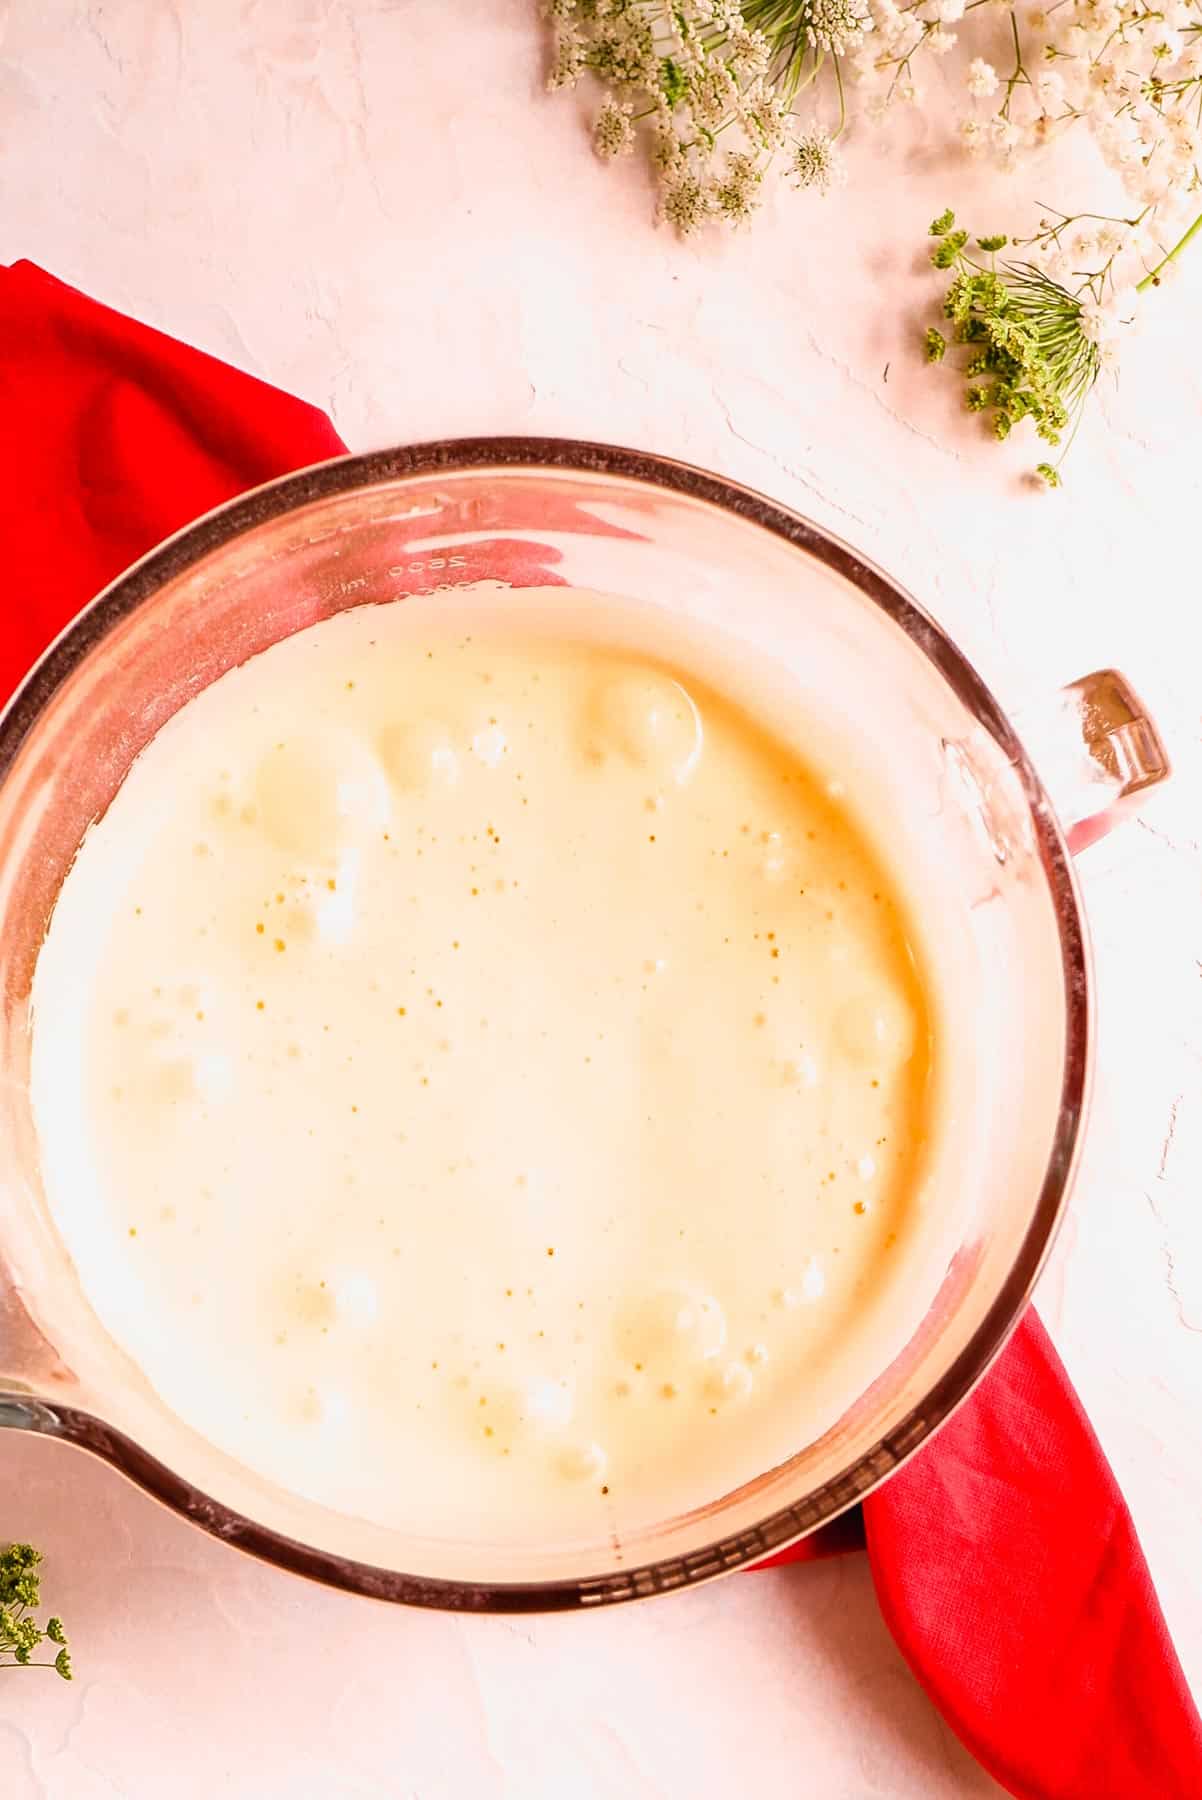
What we're looking for is "ribbon" stage, which is much softer than the stiff peak of an egg white. To check if you've reached "ribbon stage" (usually after about 5 minutes of whipping in this recipe), stop the mixer and use the whip or a spatula to drop some of the mixture back onto its surface. You want the ribbon you're making to melt back into the mixture in the count of 3, but not sooner. If it melts in much faster, keep whipping!
Special tools and equipment you'll need...
You'll definitely need a stand or hand mixer for this recipe, and a 10" round springform or traditional cake pan.
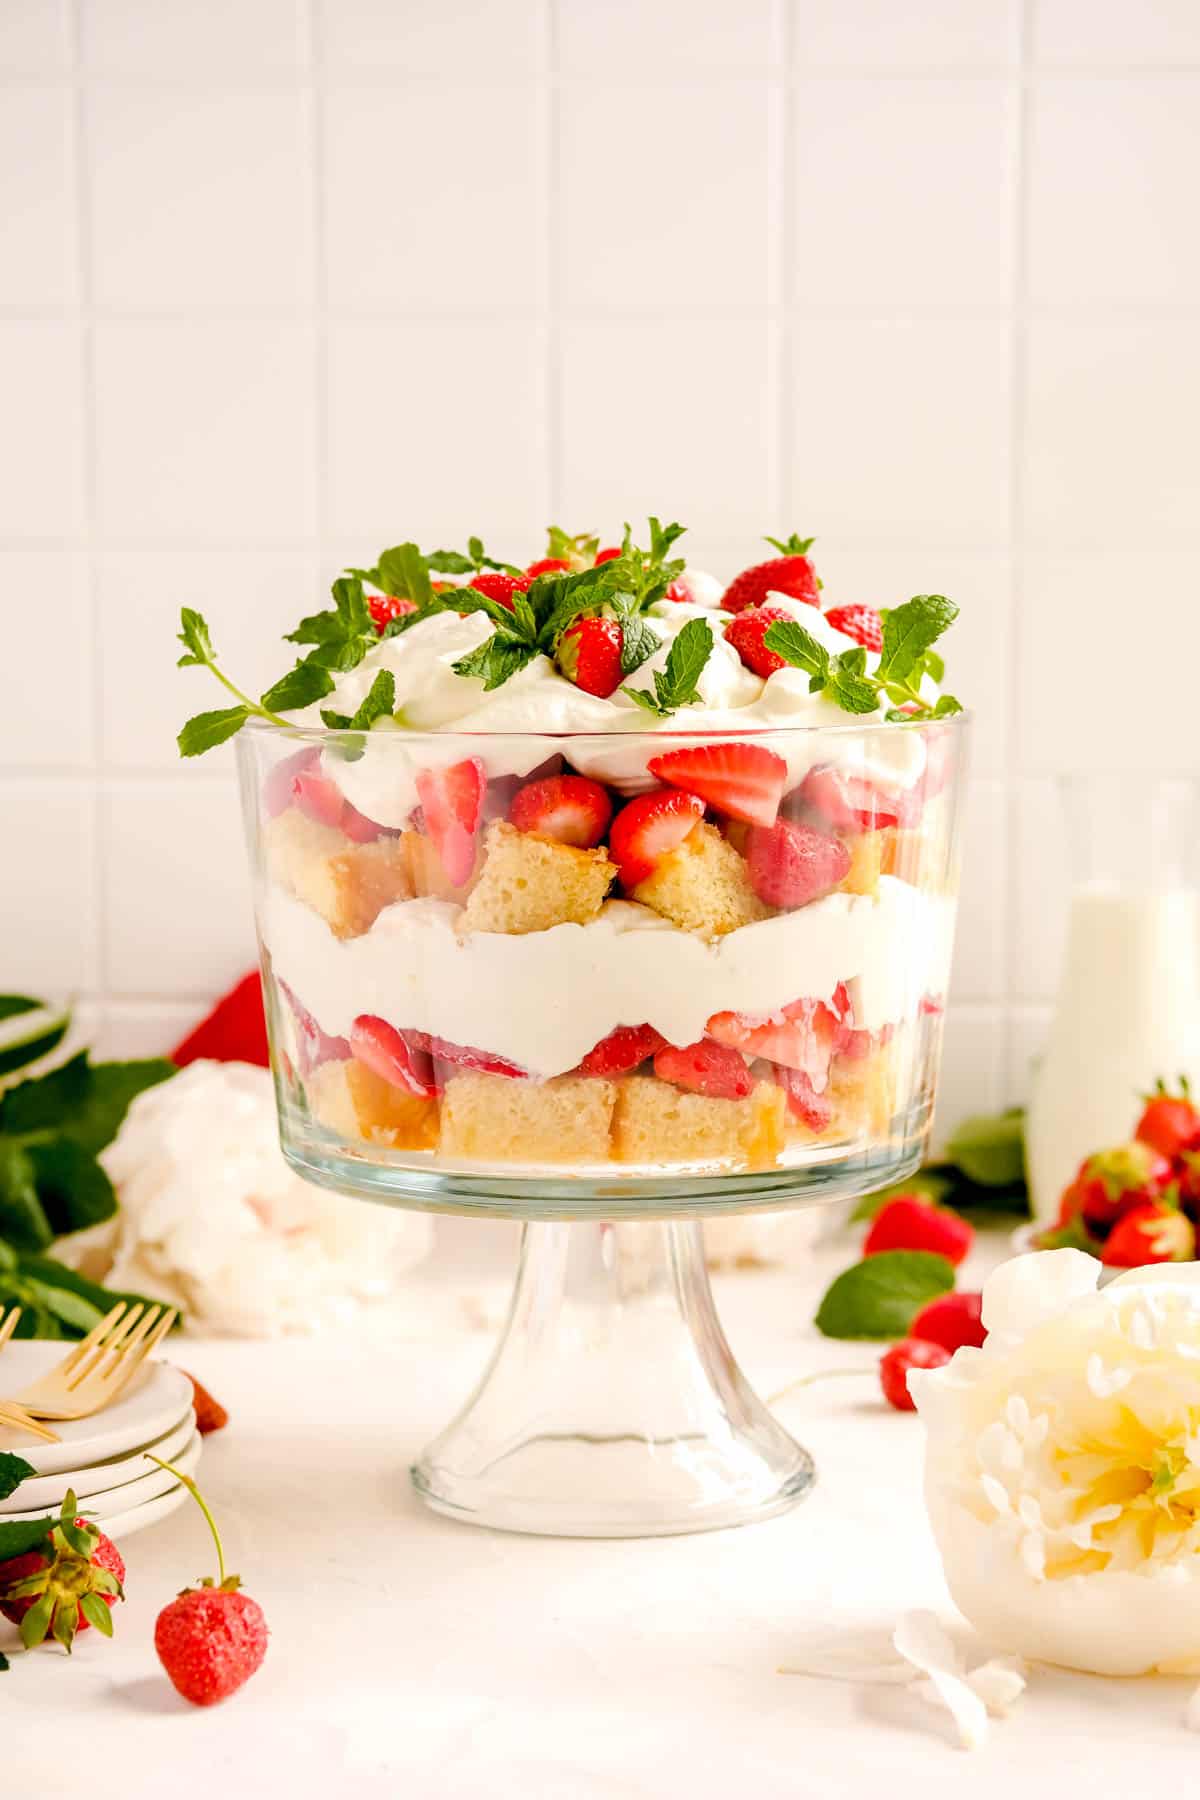
It's also helpful to have a trifle dish for displaying the beautiful layers in this recipe. But that said, you can always build your trifle in mason jars or wine glasses for individual servings, or even just a large bowl. It'll be just as tasty no matter what you serve it in!
How to make this trifle recipe...
(Pssst…if you're ready to just get baking, get all the details in the recipe card below!)
THE *DAY BEFORE* BAKING:
- Make the simple syrup and allow it to infuse overnight. *Please note* The rest of this recipe should be prepared on the day of service.
TO MAKE THE CAKE:
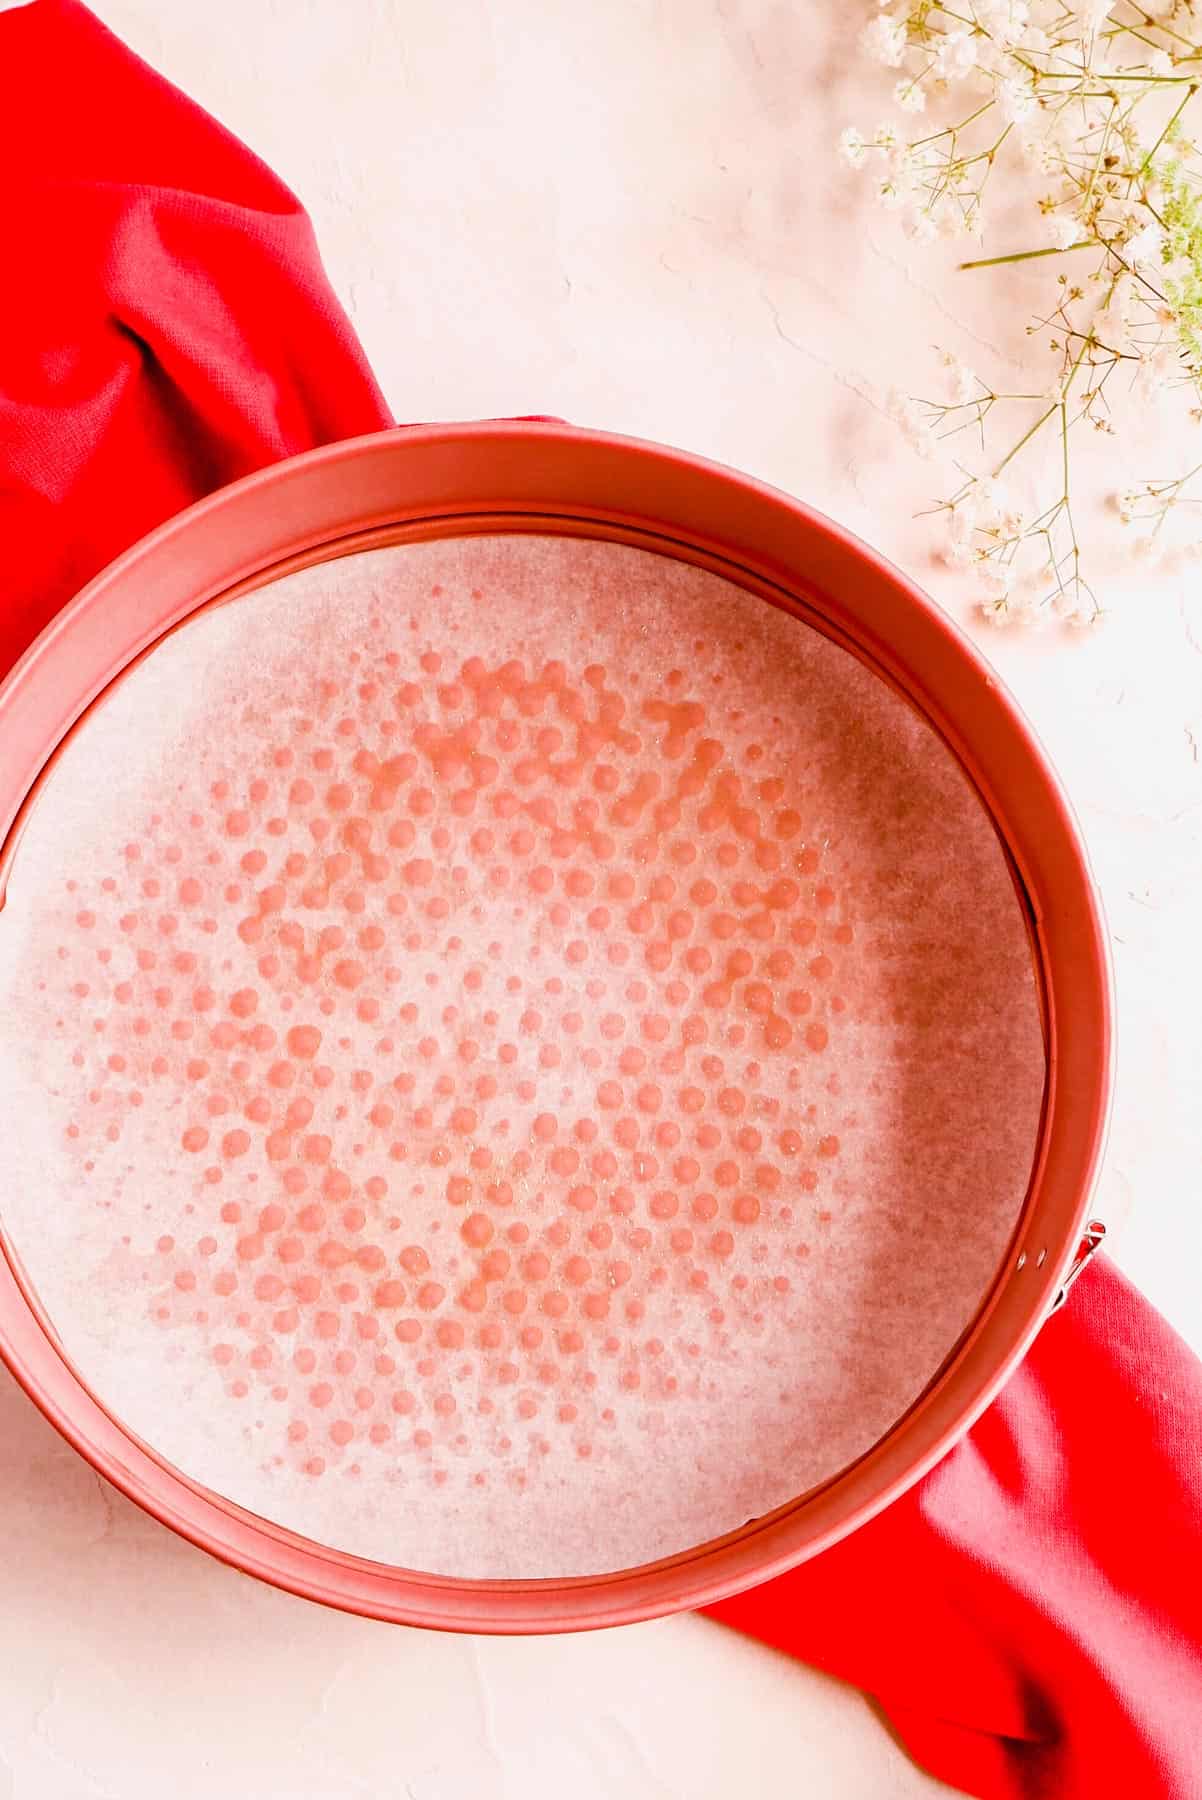
- Preheat your oven, and grease/line your pan, being careful not to get grease on the sides.
- Melt your butter.
- Sift together your flour and cornstarch to remove clumps.
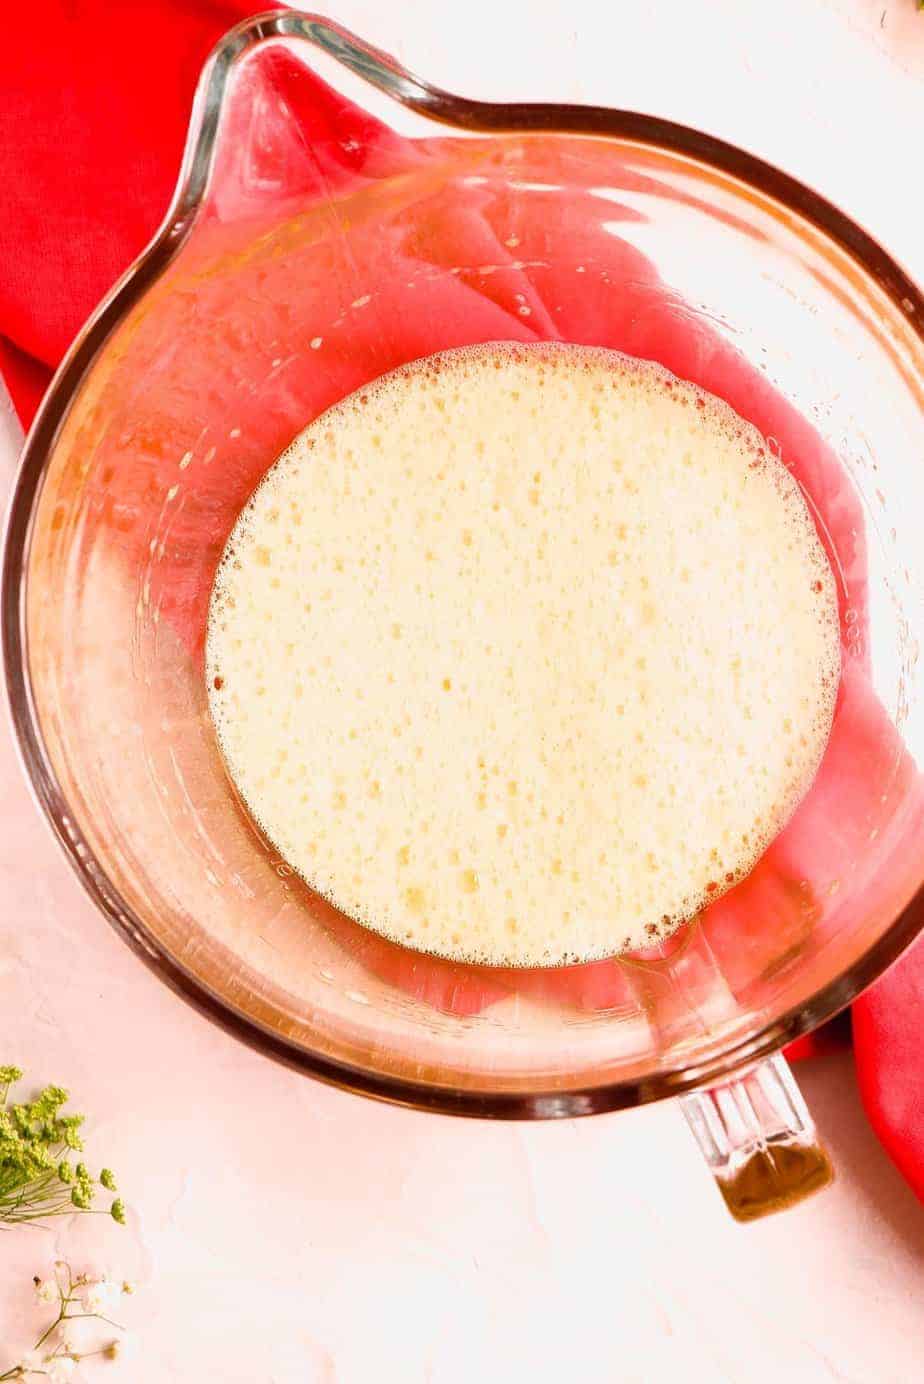
- Whip your eggs until foamy, then slowly add in the sugar.
- Continue whipping until you reach "ribbon" stage.
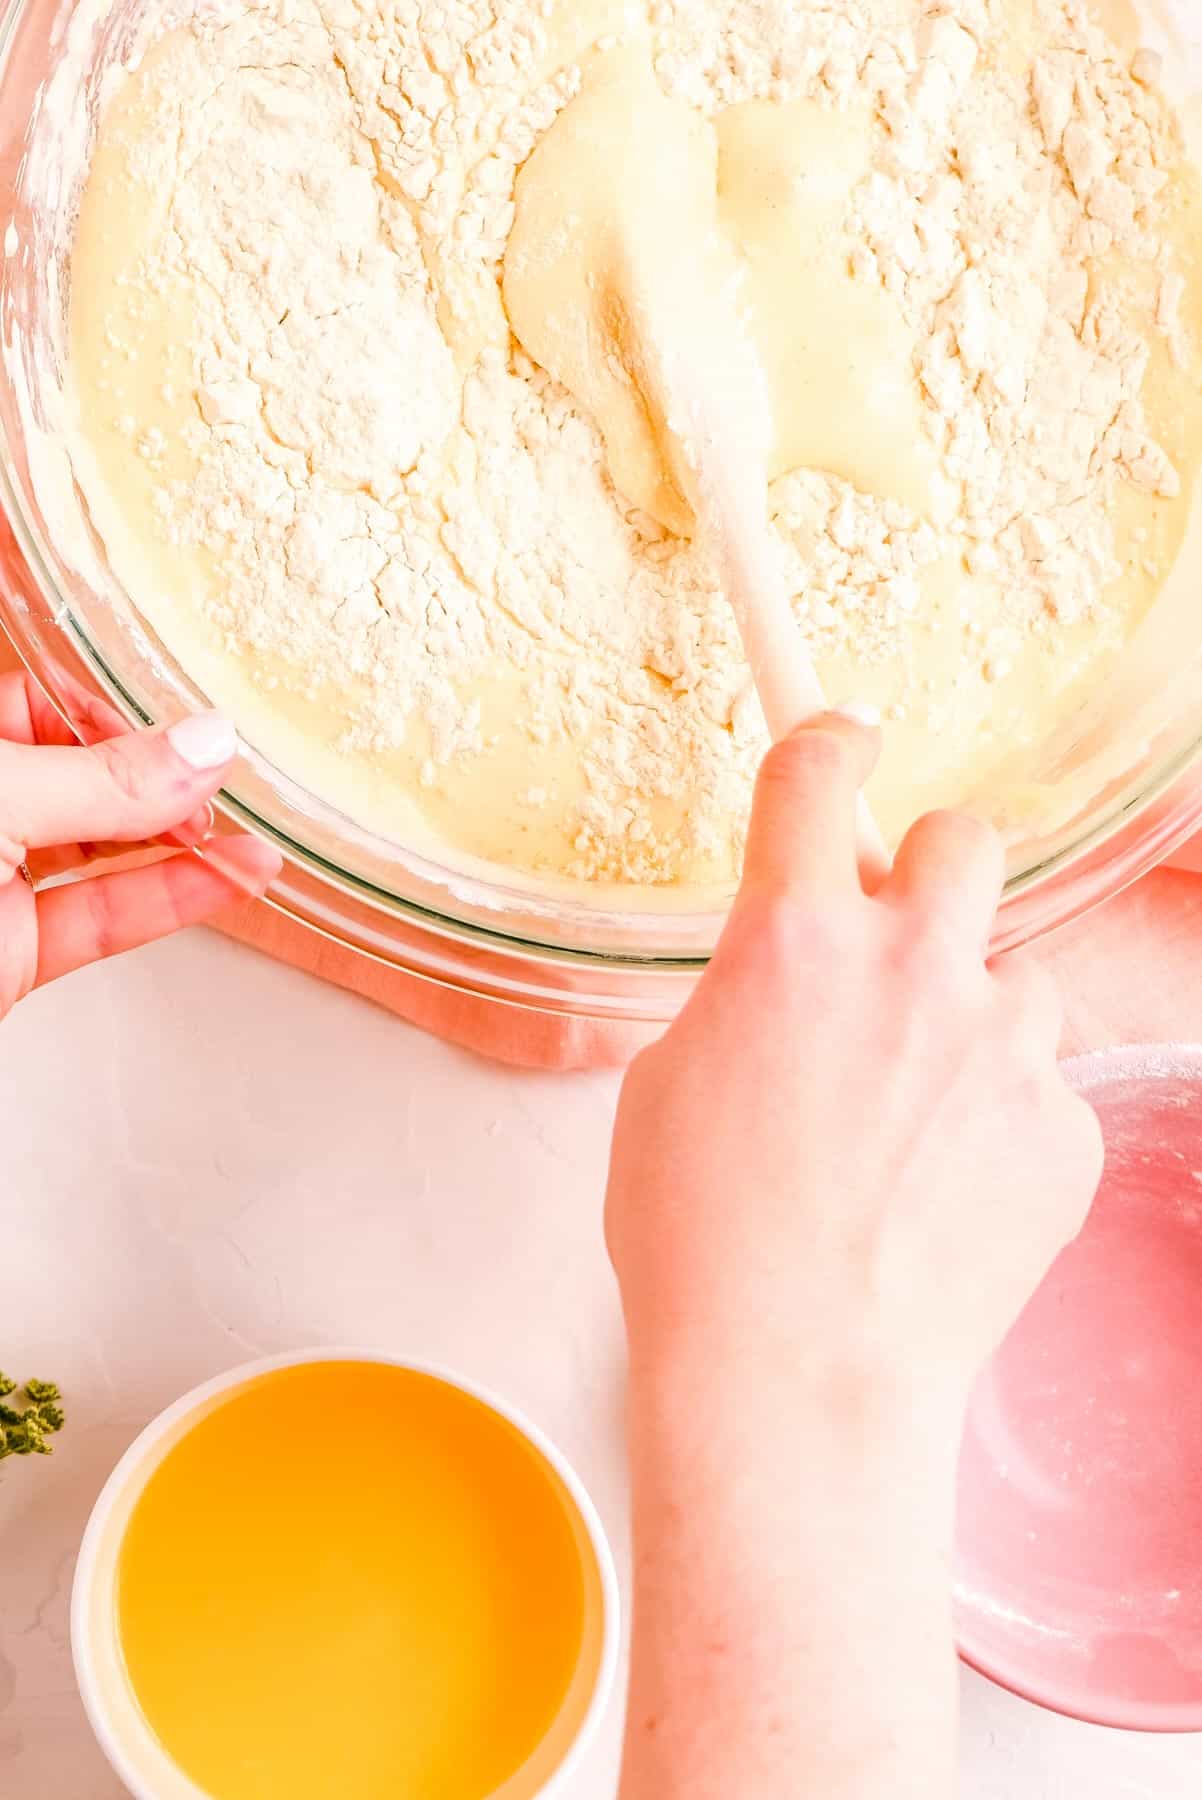
- Carefully fold in the flour so you don't deflate your batter (see our folding tutorial here!).
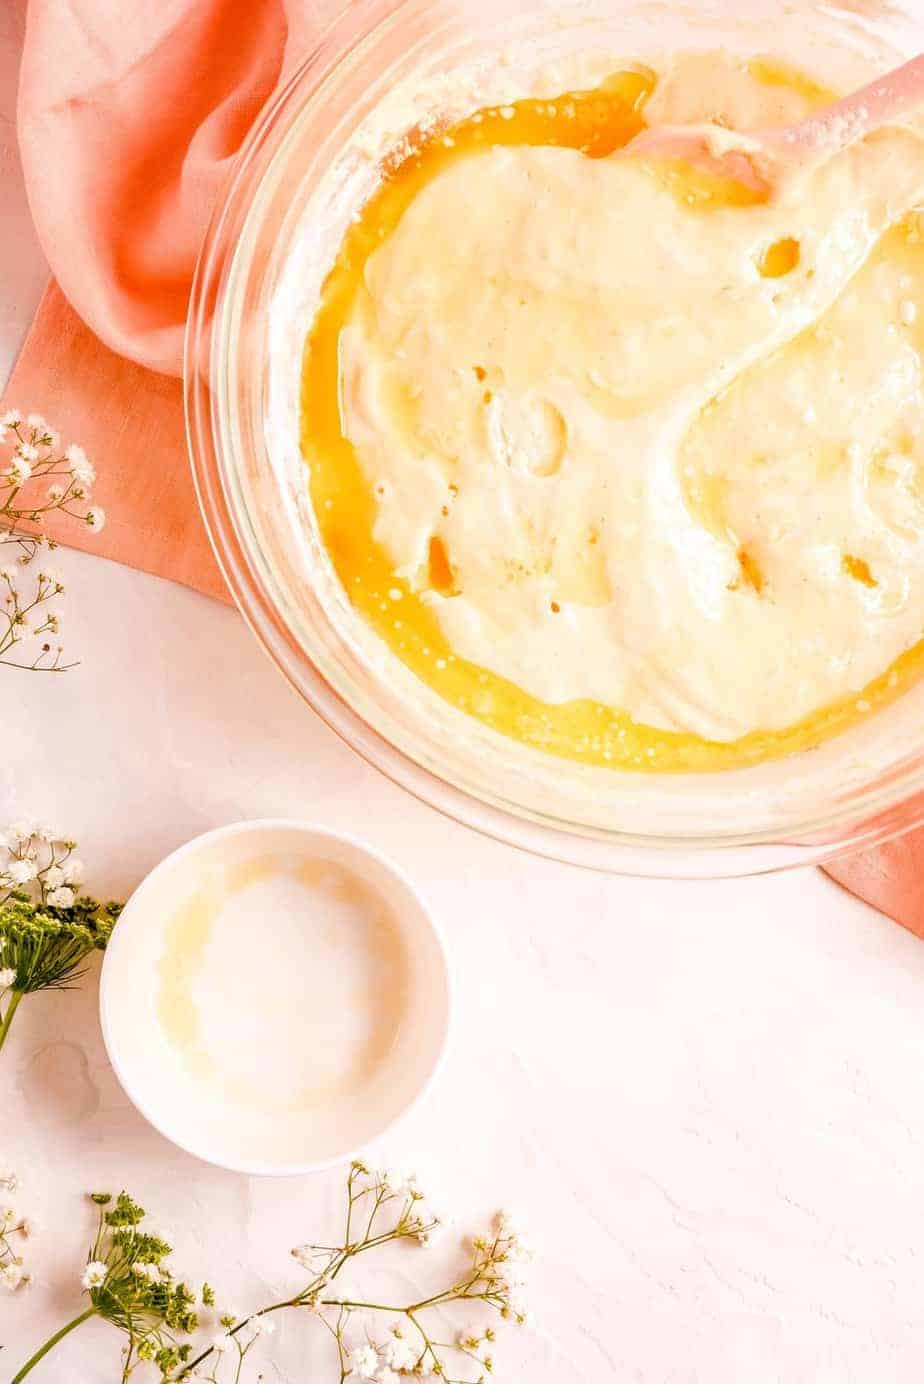
- Gently stir in the melted butter.
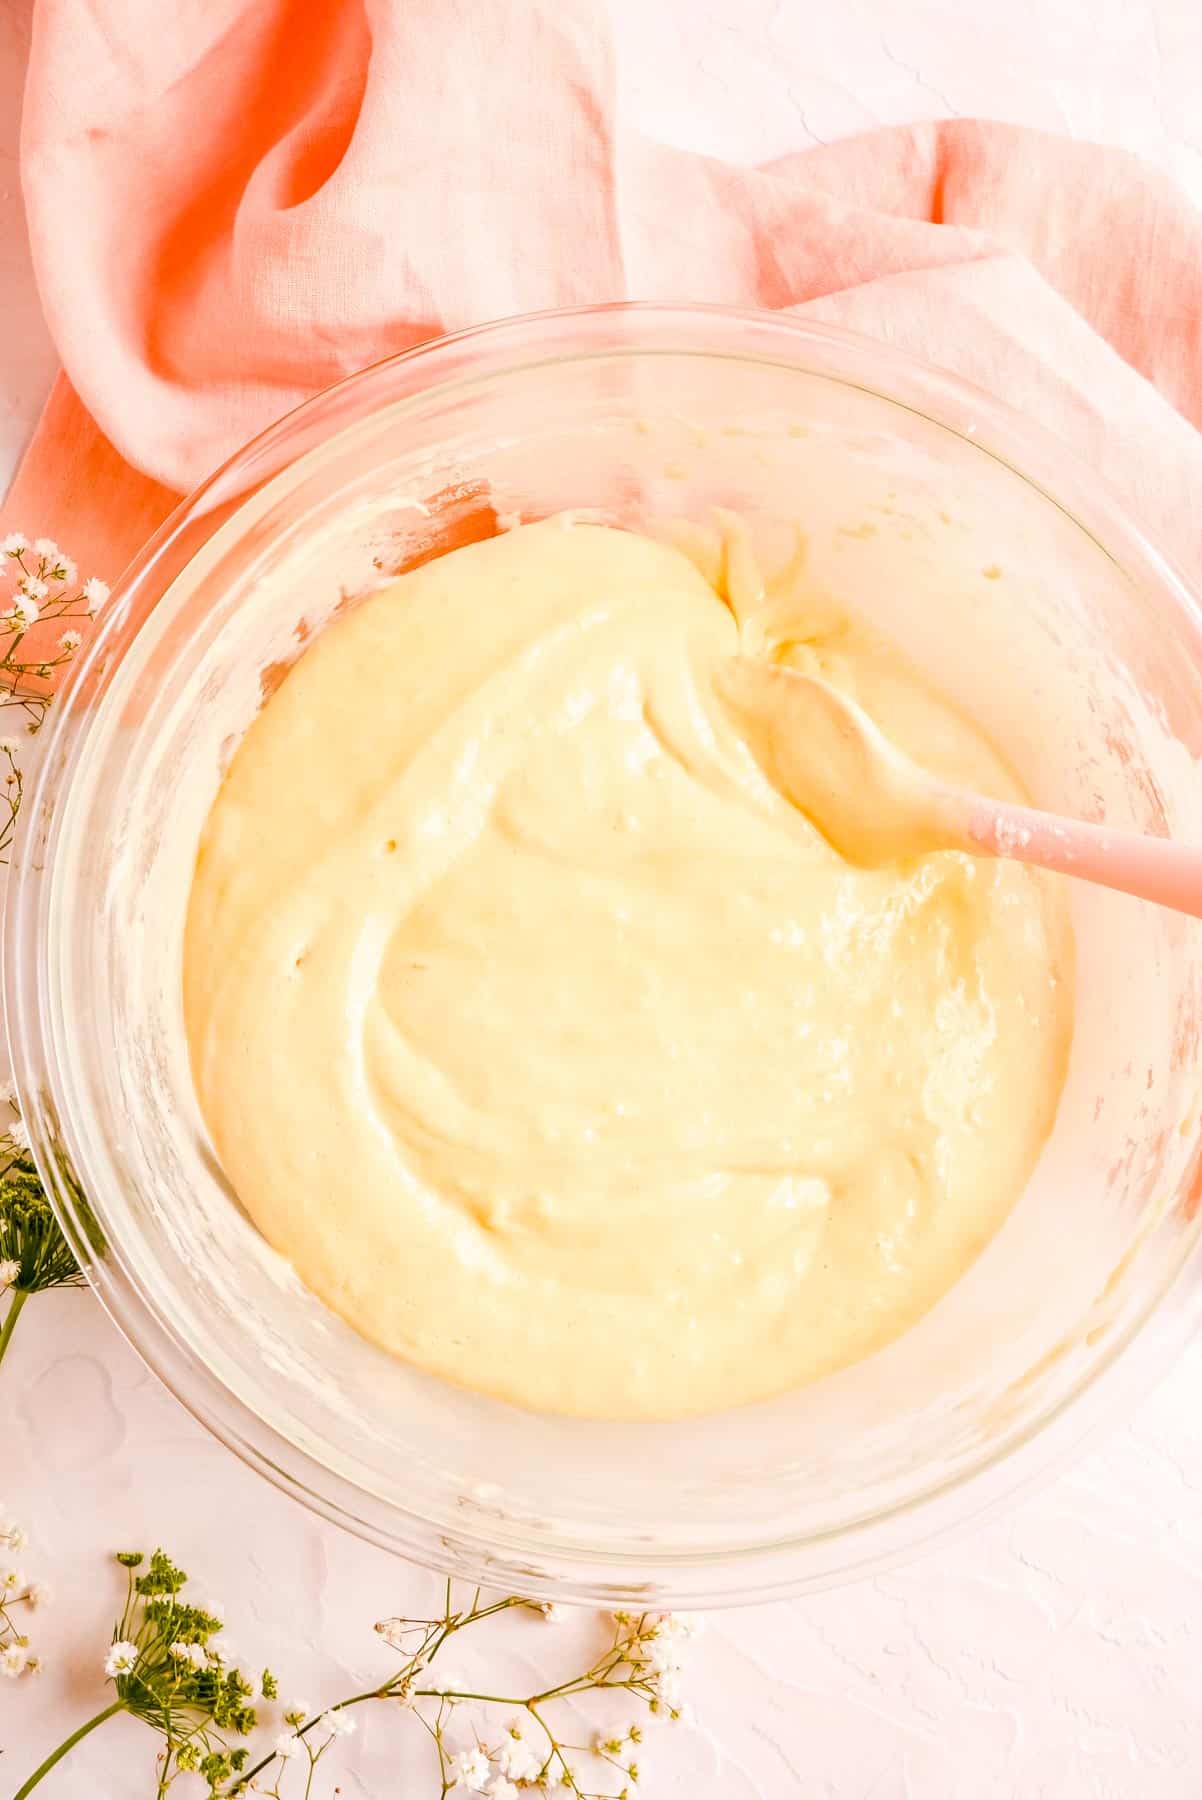
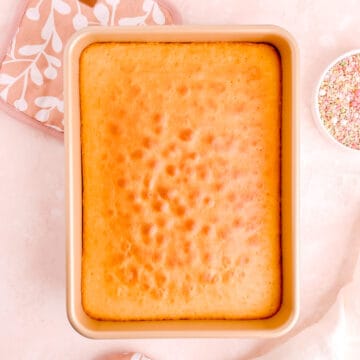
- Transfer the batter to your pan and bake until set and golden brown.
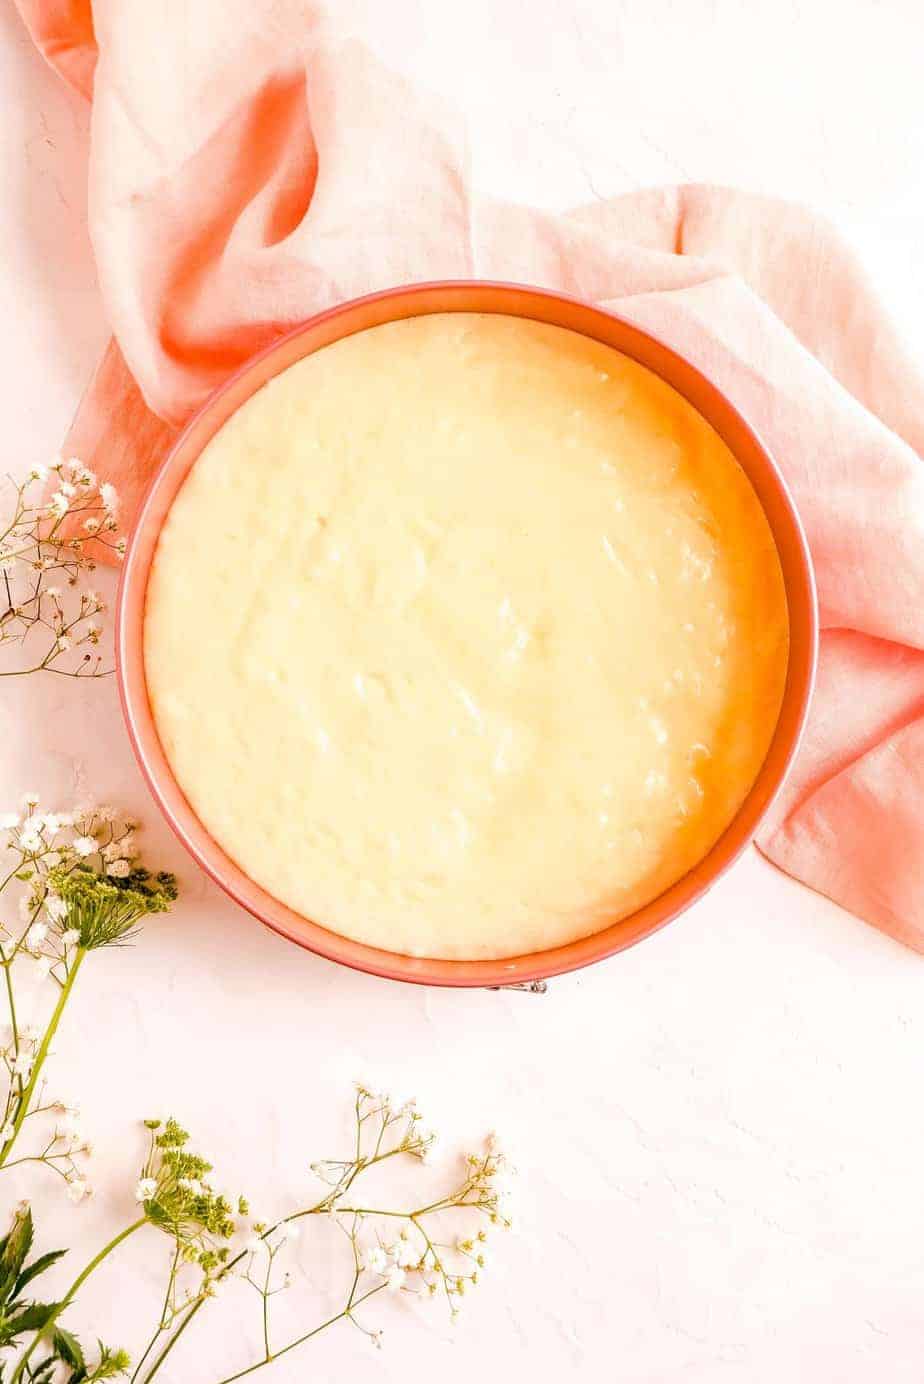
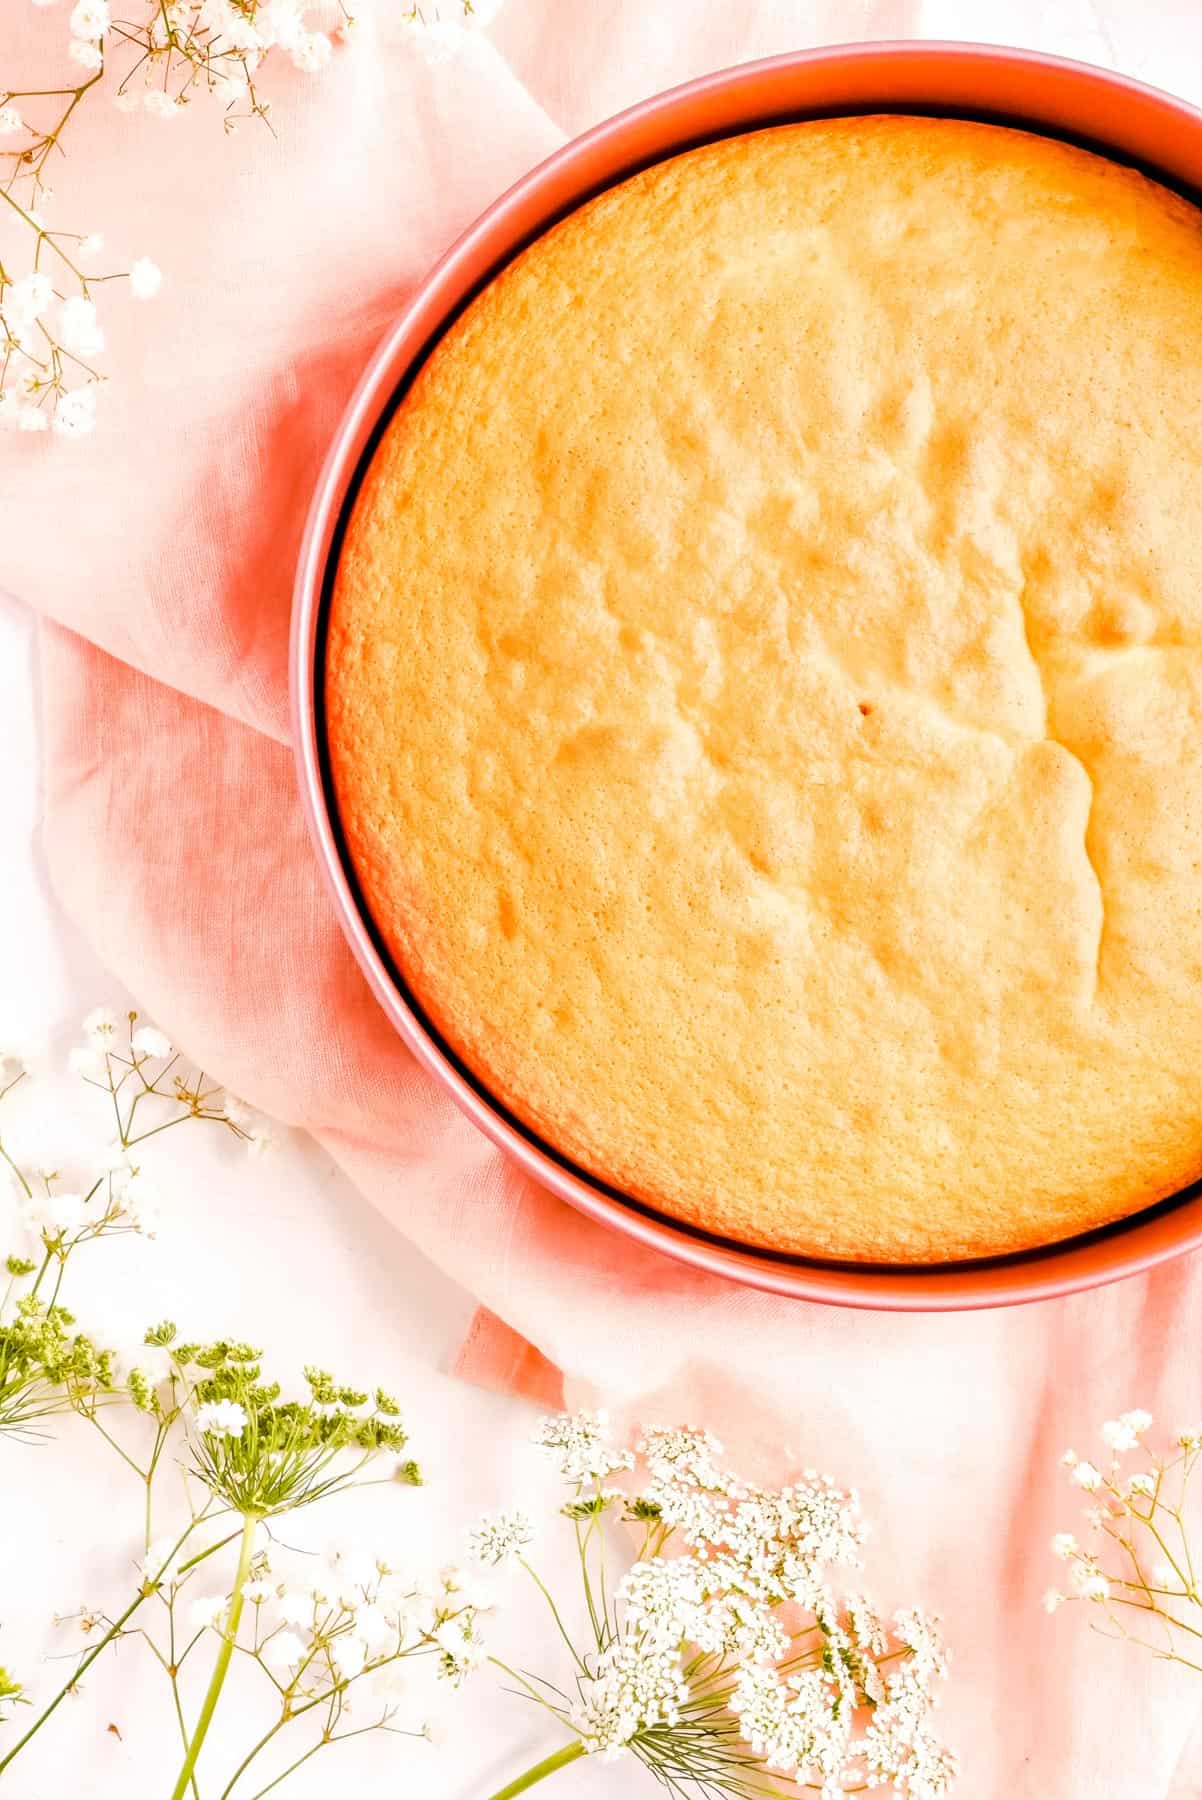
- Cool to room temperature in the pan.
TO PREP CAKE, BERRIES AND CREAM:
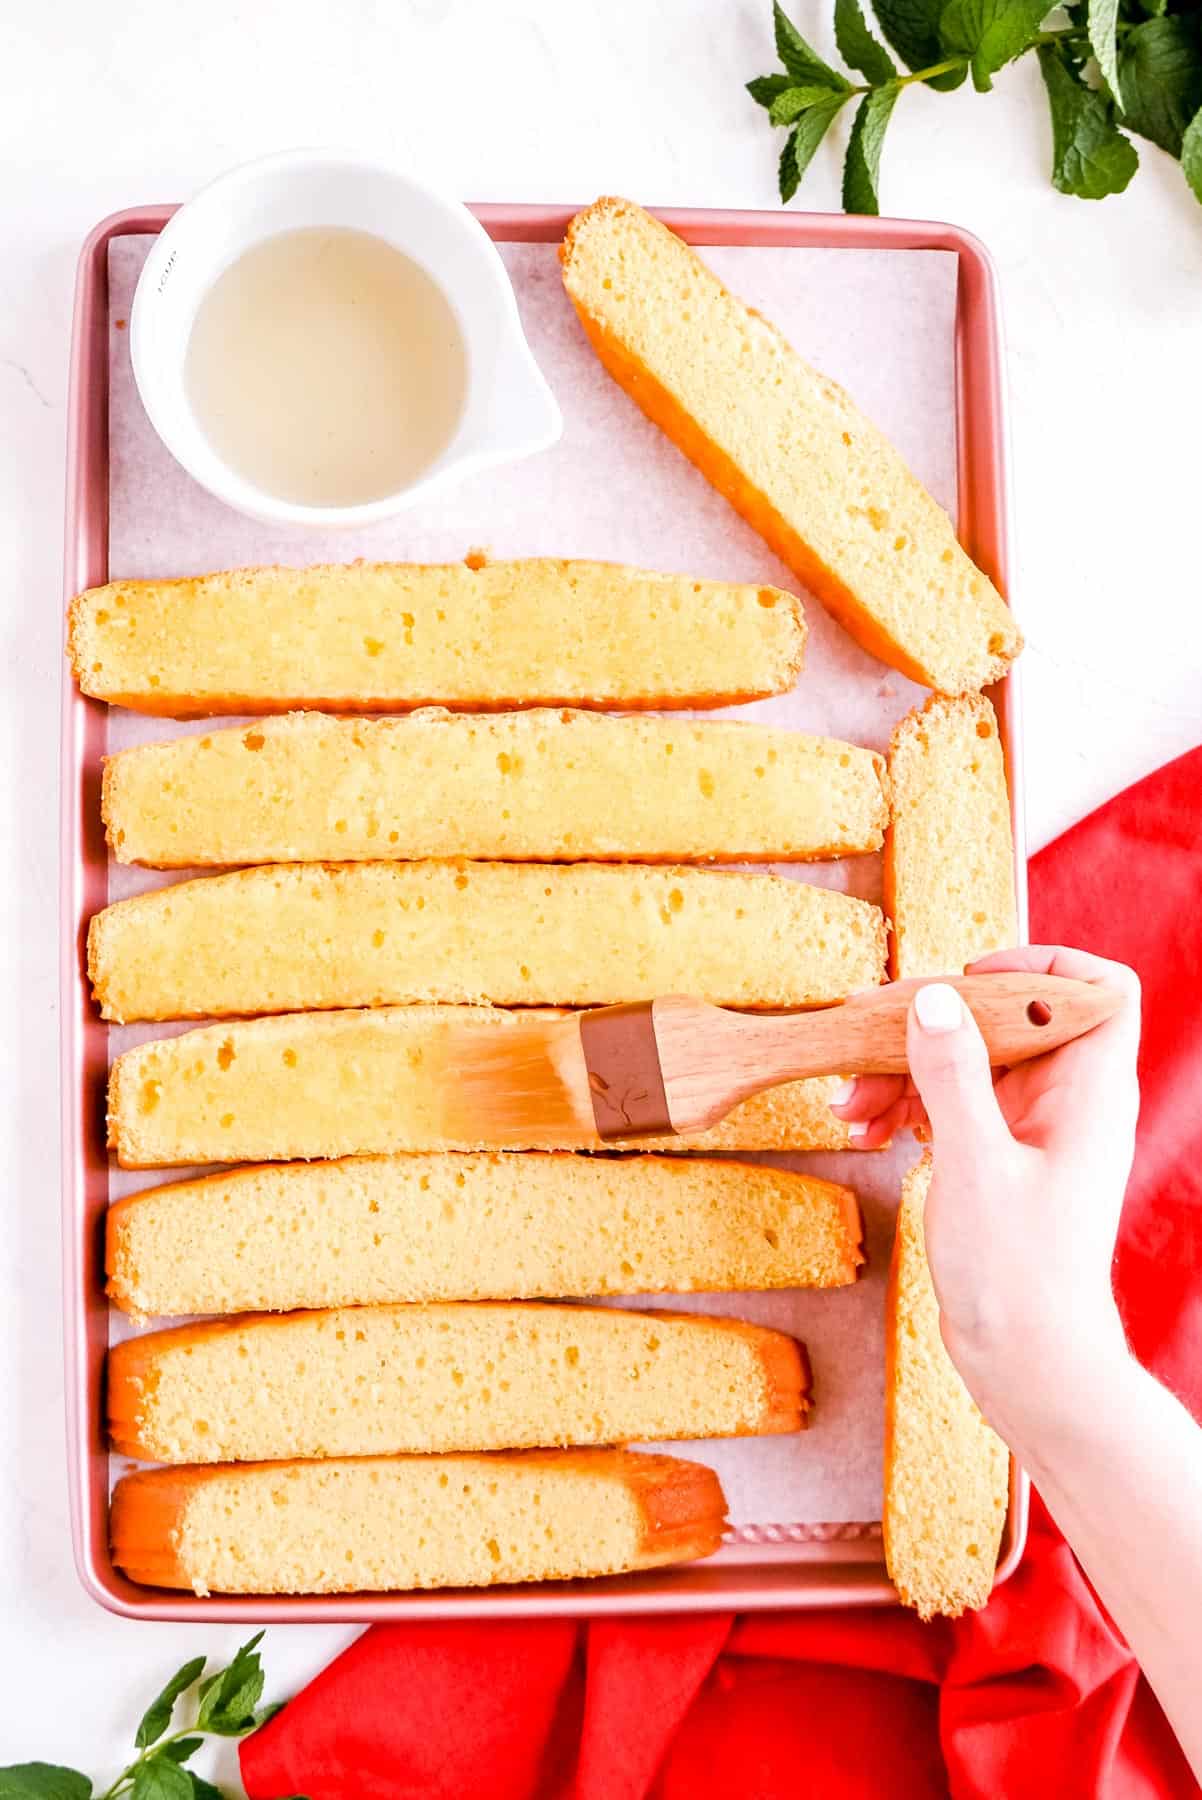
- Un-pan your cake once fully cool, and slice it into strips.
- Soak the cake thoroughly on both sides with the Mint Simple Syrup.

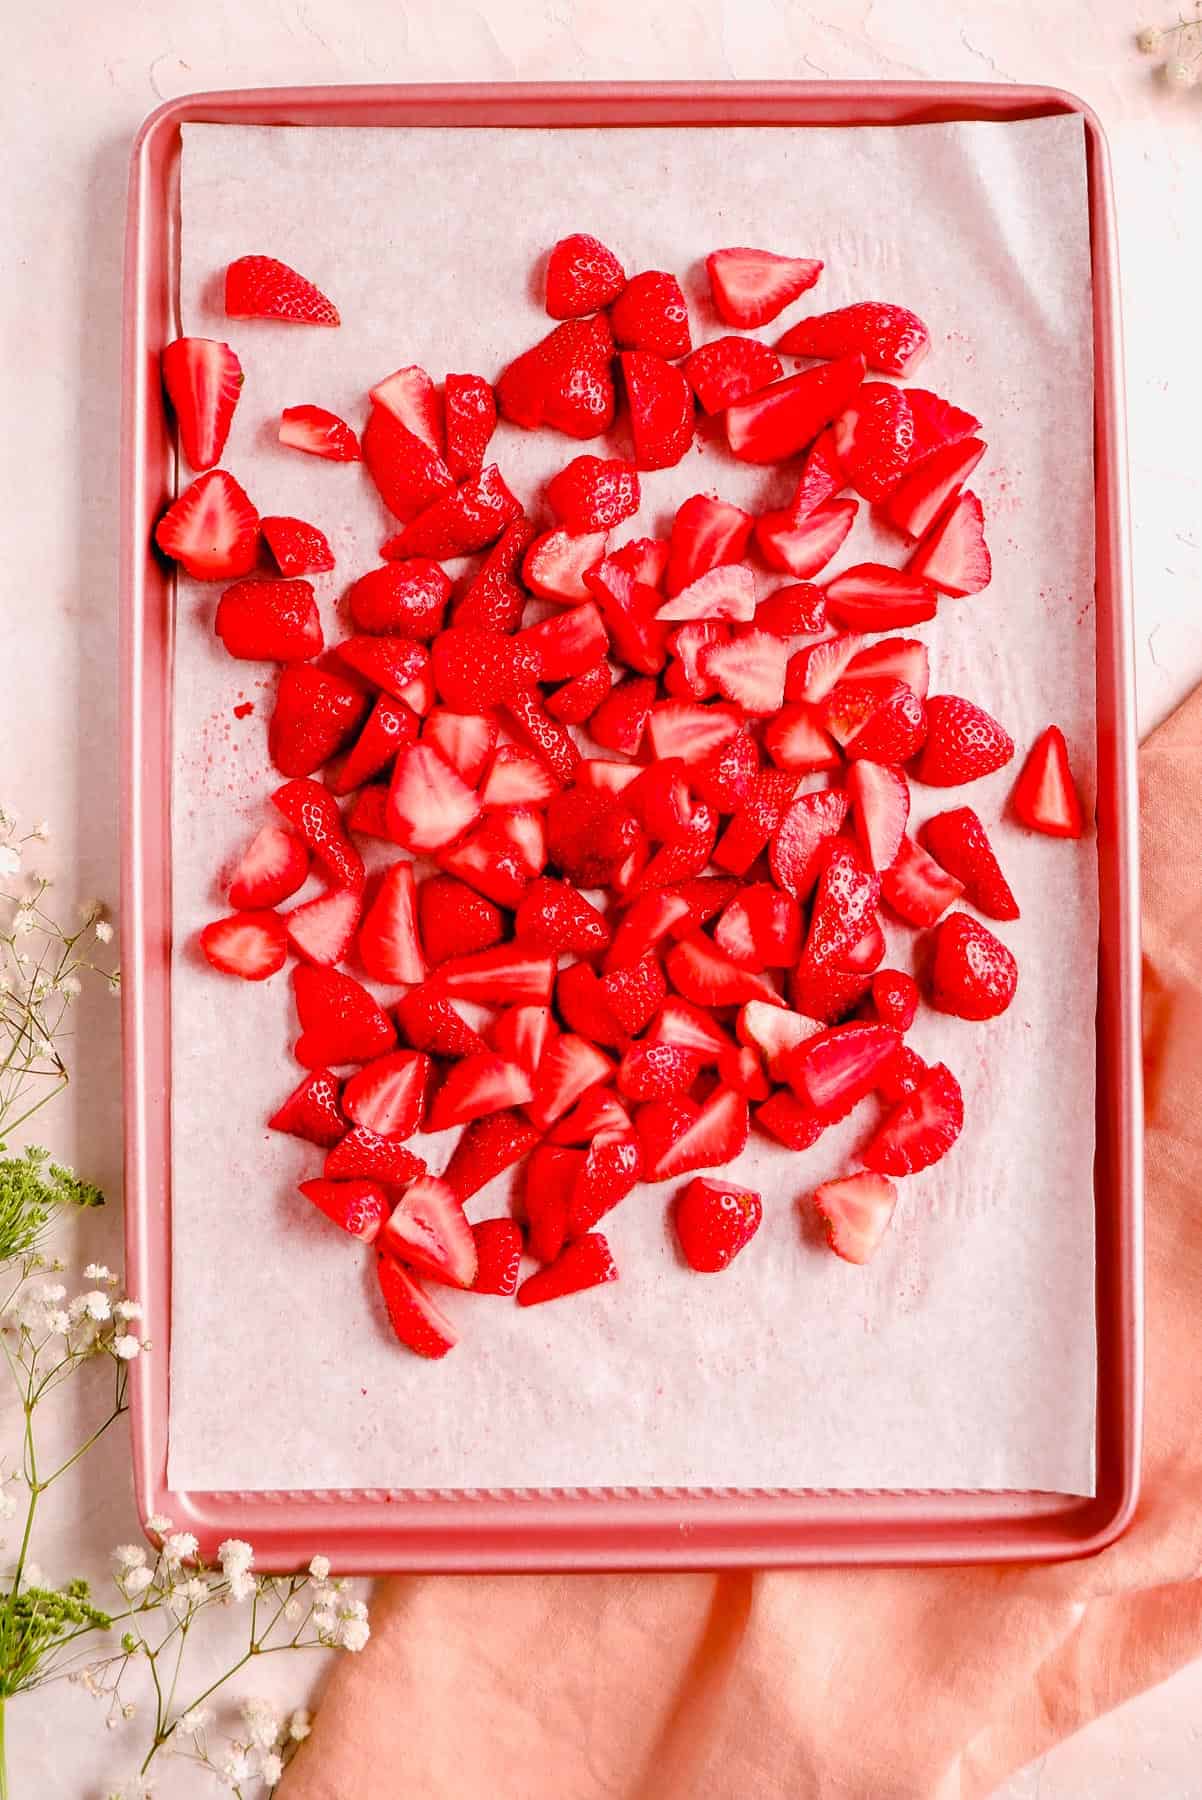
- Clean and cut all your berries into bite sized pieces.
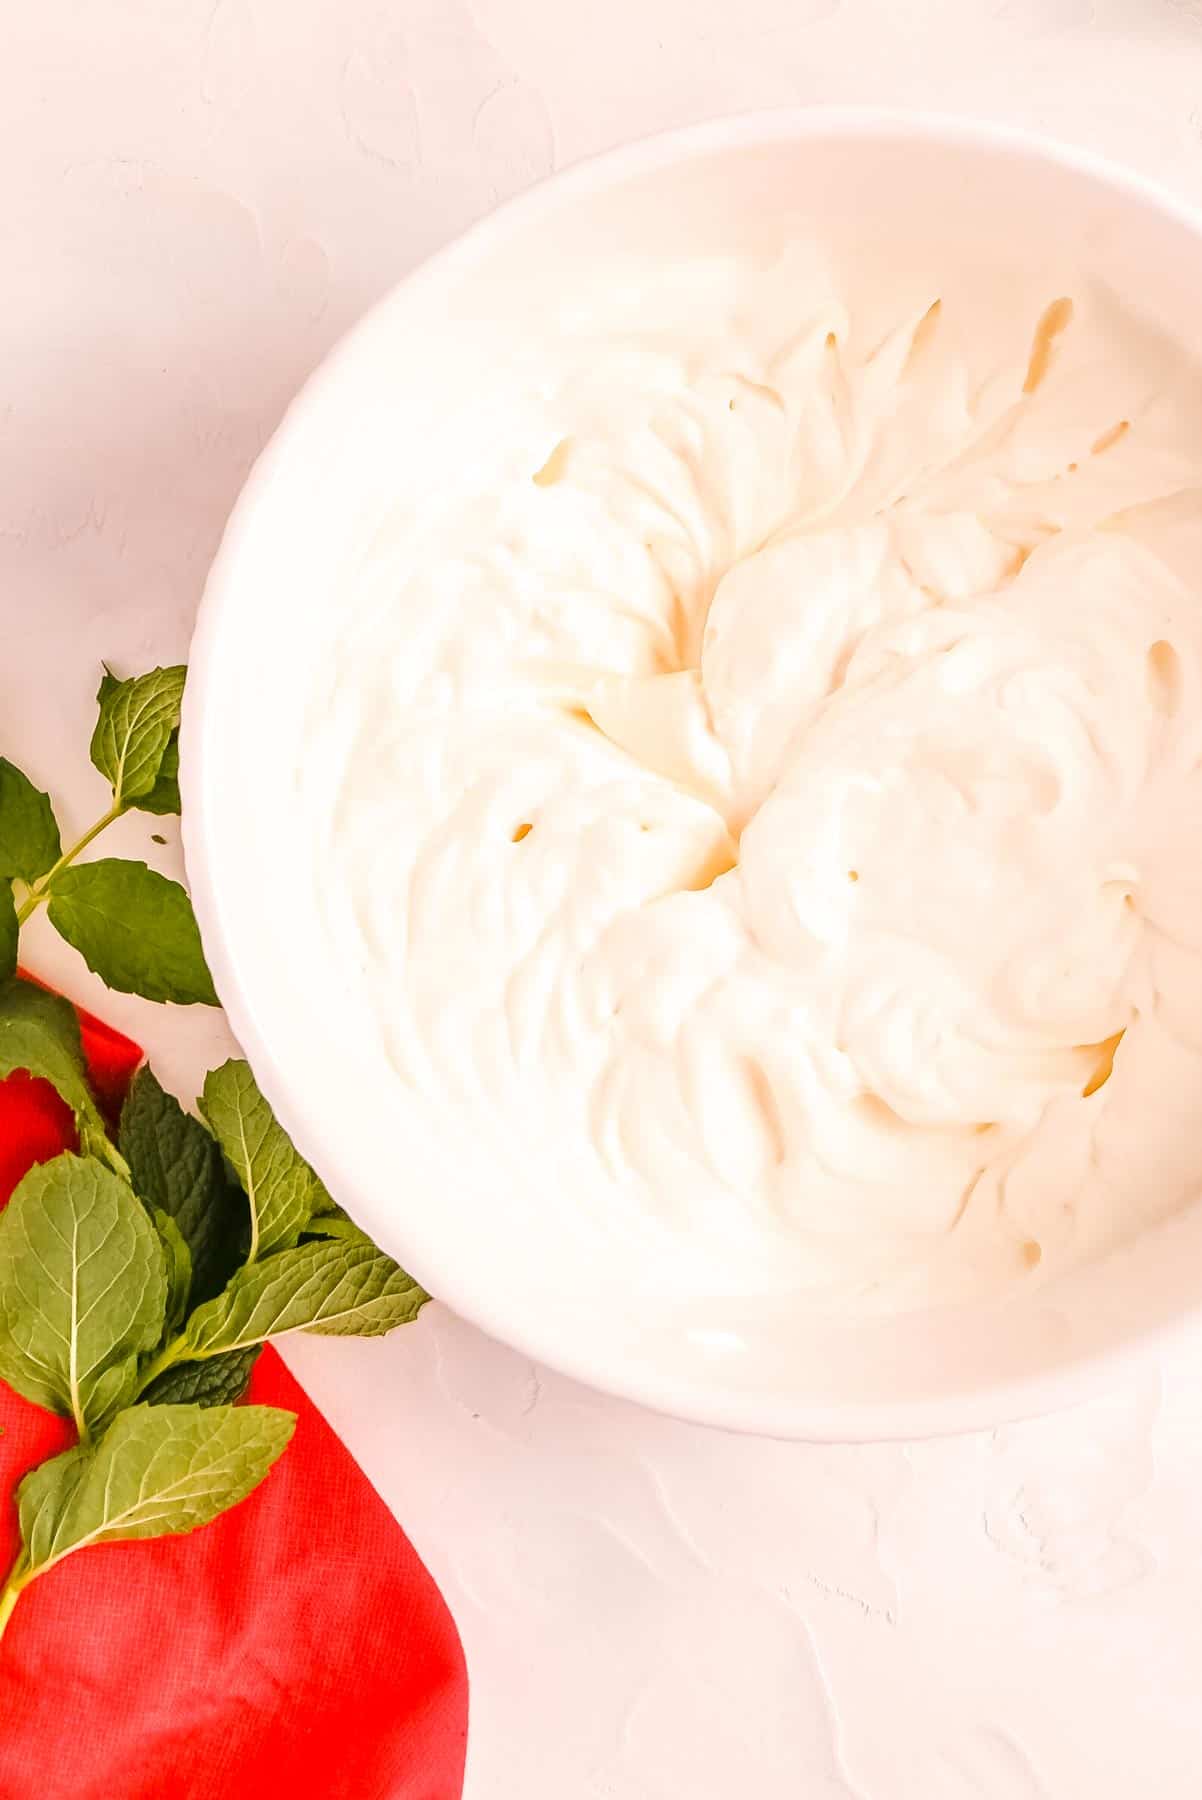
- Whip your cream until light, fluffy, and holding soft peaks.
- Slice your soaked cake strips into cubes.

TO BUILD THE TRIFLE:
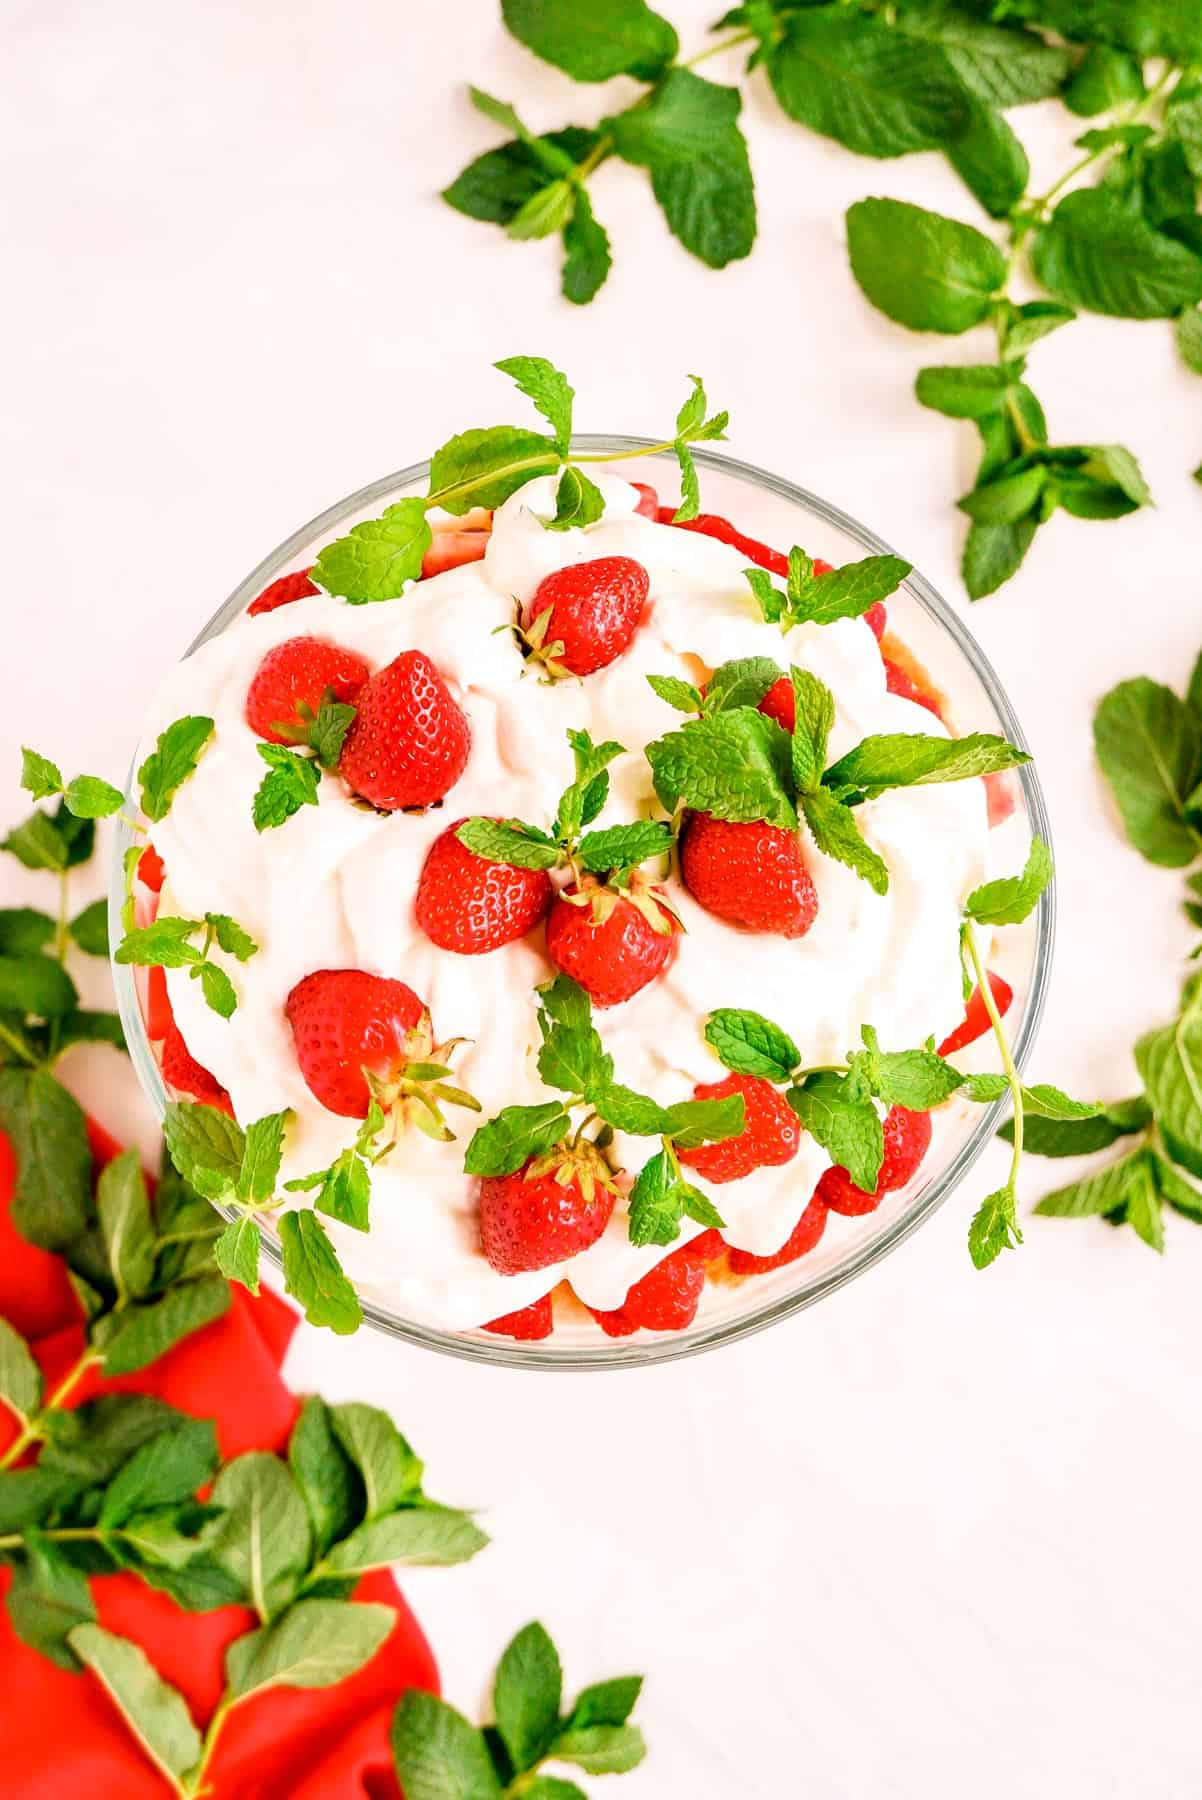
- Check out our time-lapse below to see the layers all stacked up! They go...cake, berries, cream, cake, berries, cream...and then garnish!
Let's stack it up: time-lapse assembly VIDEO!
Check out the full recipe web story for a click-through tutorial!
Fun ways to make this recipe your own...
- Almond whipped cream: you can use a vanilla simple syrup to soak your layers and add a little almond extract to your whipping cream for a delicious almond twist! I'd start with ¼ teaspoon almond extract in the cream, and add more to taste if needed.
- A zesty citrus twist: alternatively, you could also pair a vanilla simple syrup with some citrus zest. Simply add the zest of one orange or one lemon to your cream before whipping for another fresh twist on this strawberry trifle.
- Trifle with custard: traditional trifle is often made with a heavier custard, or even a pastry cream. If you enjoy this richer type of filling, feel free to substitute in your favorite custard or pastry cream recipe for the whipped cream!
*Expert Tips and Tricks* for making the tastiest trifle...
What's the TOP TIP for making the best trifle?
Because we're making fresh whipped cream instead of using store-bought with stabilizers, you'll want to whip the cream, and assemble your trifle just before service. See above for more details and while leftovers can be stored air-tight in the fridge for up to 2 days, this trifle is definitely best enjoyed fresh!
What exactly are you looking for when beating whole eggs and sugar until light and fluffy?
In short, you're looking for your eggs to increase at least 2-3 times in volume and turn very pale yellow in color. From there, you want to check that you've reach ribbon stage - essentially that the mixture will hold a ribbon of itself on the surface for a few seconds before sinking back in. Check out more info on exactly how to do this above or in the recipe card below!
What are the layers of a trifle?
In short, trifle is layers of cake, fruit/jam, and a cream or custard. You usually repeat these layers twice if not more, and the specific recipes used can very quite a bit depending on your preference for a lighter or heavier dessert, and which flavors best compliment your fruit or jam of choice. Check out the video above to see just how the layers of a trifle are stacked up!
Why is this sponge cake dry?
Although it may seem a little odd, many sponge cakes are designed to be on the drier side, especially when compared to a traditional american-style layer cake. The base ingredients of a sponge recipe, don't bring a lot of moisture to the table (there's no milk, or cream, or sour cream, or yogurt for example), and this is what allows sponge cakes to rise so high and to maintain such a light texture.
Traditionally a sponge cake is a recipe design to be paired with a soak, which can be straight alcohol, like amaretto, or a simple syrup or even a more complex flavored syrup as well. This creates the perfect combination of a light and fluffy cake that is a blank canvas to take on whatever flavor you supply with your soak, which then brings all the moisture you need right back to that sponge cake.
Other recipes fans of this berry trifle will love:
For strawberry lovers especially, don't miss out on one of our all-time favorite strawberry recipes - Mini Strawberry Donut Muffins! And this Strawberry Simple Syrup recipe will help you preserve that fresh strawberry flavor all summer long.
P.S. I know this recipe card can make this recipe look intimidating, but I promise it's not hard to make a delicious trifle! I just wanted to give you a super thorough set of instructions to make sure you have everything you need to make the best trifle you could ever imagine.

⭐ If you gave this recipe a try please give it a ⭐ rating and tag me on Instagram @mint.and.mallow.kitchen so I can see what you're baking up! ⭐
📖 Full Recipe

Fresh Mint Strawberry Trifle
Ingredients
FOR THE *DAY BEFORE* PREP:
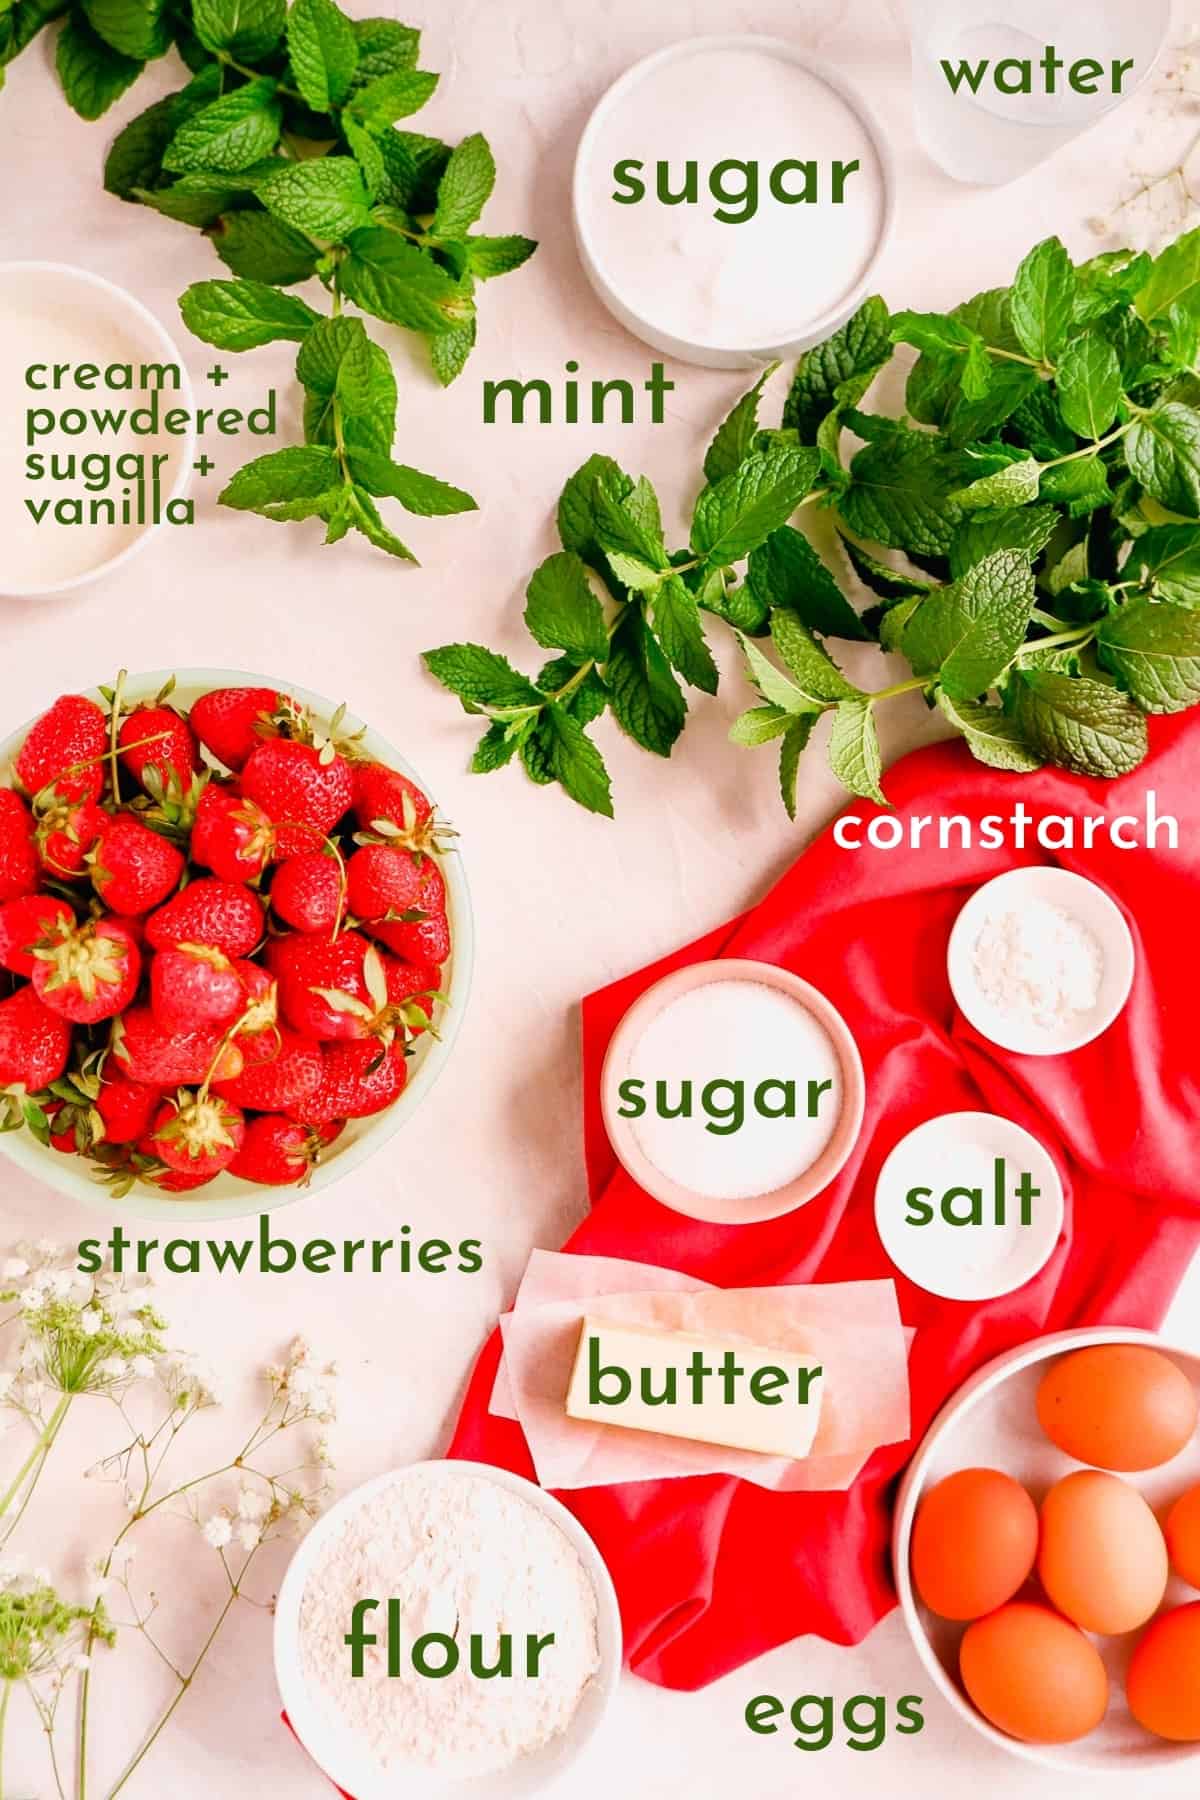
- 1 cup Mint Simple Syrup ( for soaking, see notes)
FOR THE SPONGE CAKE:
- 6 tablespoons (¾ stick) unsalted butter (melted)
- 1 ¼ cups all-purpose flour
- 1 tablespoon cornstarch
- 6 large eggs
- ¼ teaspoon salt
- 1 cup granulated sugar
FOR ASSEMBLY:
- 5 cups fresh strawberries (about 2 pints)
- 3 cup heavy cream
- ½ cup powdered sugar (sifted)
- 1 teaspoon vanilla extract
- Fresh mint leaves ( for garnish, optional)
Instructions
*DAY BEFORE* BAKING - MAKE SYRUP:
- Make the simple syrup: prepare the Mint Simple Syrup and store it in the fridge for at least 12-24 hours before assembly to infuse (please see our Mint Simple Syrup Recipe for full instructions). The remaining steps should ideally be completed on the day you plan to serve the trifle.
TO MAKE THE CAKE:
- Preheat and prep: preheat your oven to 350°F and place your baking rack in the middle of the oven. Lightly grease the bottom of a 10" round cake pan or springform pan (don't grease the sides though so the cake can grip onto them!). Line with a piece of parchment, cut to fit in the bottom of the pan, then lightly grease the top of the parchment paper.
- Melt butter: melt butter on the stovetop or in the microwave and set aside to cool briefly while preparing other ingredients.
- Combine flour and starch: in a small bowl, sift together flour and cornstarch and set aside.
- Whip eggs and add sugar: place eggs and salt in the bowl of a stand mixer fitted with the whisk attachment (a hand mixer works too, but your arm might just get a little tired). Whip on medium speed for 2 minutes to loosen them up, then turn up to medium-high and gradually pour in sugar over 2-3 minutes in a few batches.
- Whip to ribbon stage: continue whipping eggs until you reach "ribbon stage," which may take an additional 1-2 minutes after all the sugar is in (see notes). You're looking for the eggs to get fluffy and very light in color (pale yellow), to increase 2-3 times in volume, and be thick enough to show the lines of the whisk while mixing.
- Fold in flour: gently transfer batter to a large, shallow bowl (deep stand mixer bowls are not great for folding). Using a spatula, gently fold flour into mixture in three batches, doing your best to not deflate the mixture (add the second batch when the first is about 75% blended in, and do the same for the third batch - this helps prevent deflation!). Be sure to check for flour pockets at the bottom of your bowl (see our folding tutorial here!).
- Stir in butter: drizzle melted butter over the batter and then gently stir it in, again trying not to deflate the batter too much (be sure to check the bottom of the bowl again too!)
- Transfer and bake: gently pour the batter into your prepared pan and shake to level it. Bake for 28-32 minutes until top is golden brown, fully set, and springs back when lightly touched. When ready, remove from oven and allow cake to cool fully to room temperature in the pan (it may shrink and wrinkle a little which is perfectly normal).
TO PREP CAKE, BERRIES AND CREAM:
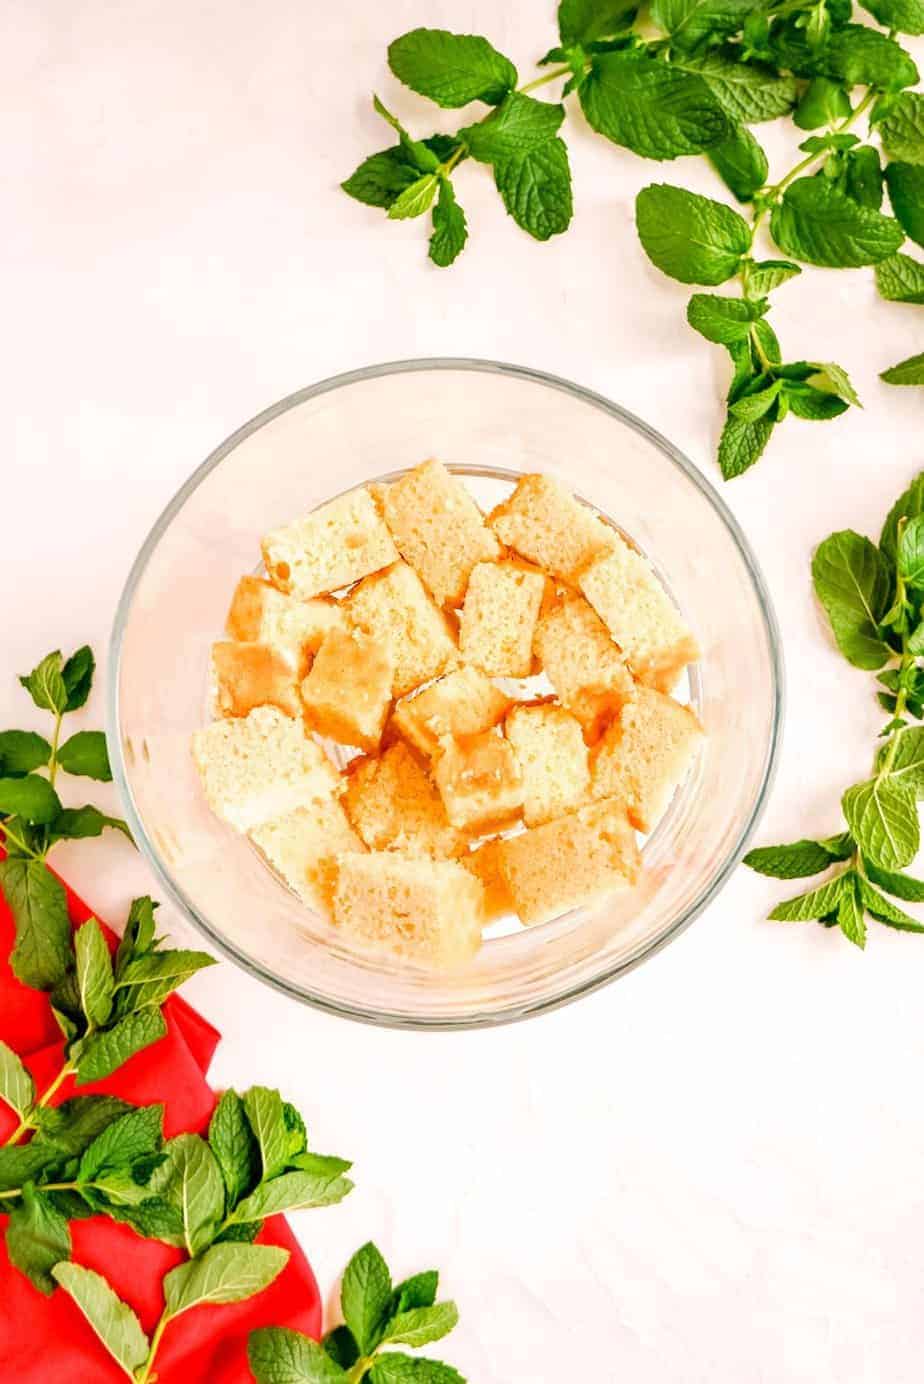
- Un-pan and slice cake: once cool, loosen the cake from the sides of the pan (if needed), flip the cake out onto a cutting board, then flip it back over so the flat bottom is on the cutting board. Use a serrated knife to slice it into ten 1" strips. Place strips on their side, cut side up, on a foil or parchment-lined baking sheet for easy clean up.
- Soak thoroughly: using a pastry brush, squeeze bottle, or pitcher with a small spout, generously soak the cut side of the cake with the Mint Simple Syrup. Soak each slice once, wait 1-2 minutes for the syrup to soak in, then flip the slices over and repeat on the other side. Continue brushing on both sides until you have used up the full cup of syrup (If you need to use a little more than a cup to get all the cake fully soaked, feel free to do so!). Set cake aside to continue absorbing the syrup while you prepare the whipped cream and berries.
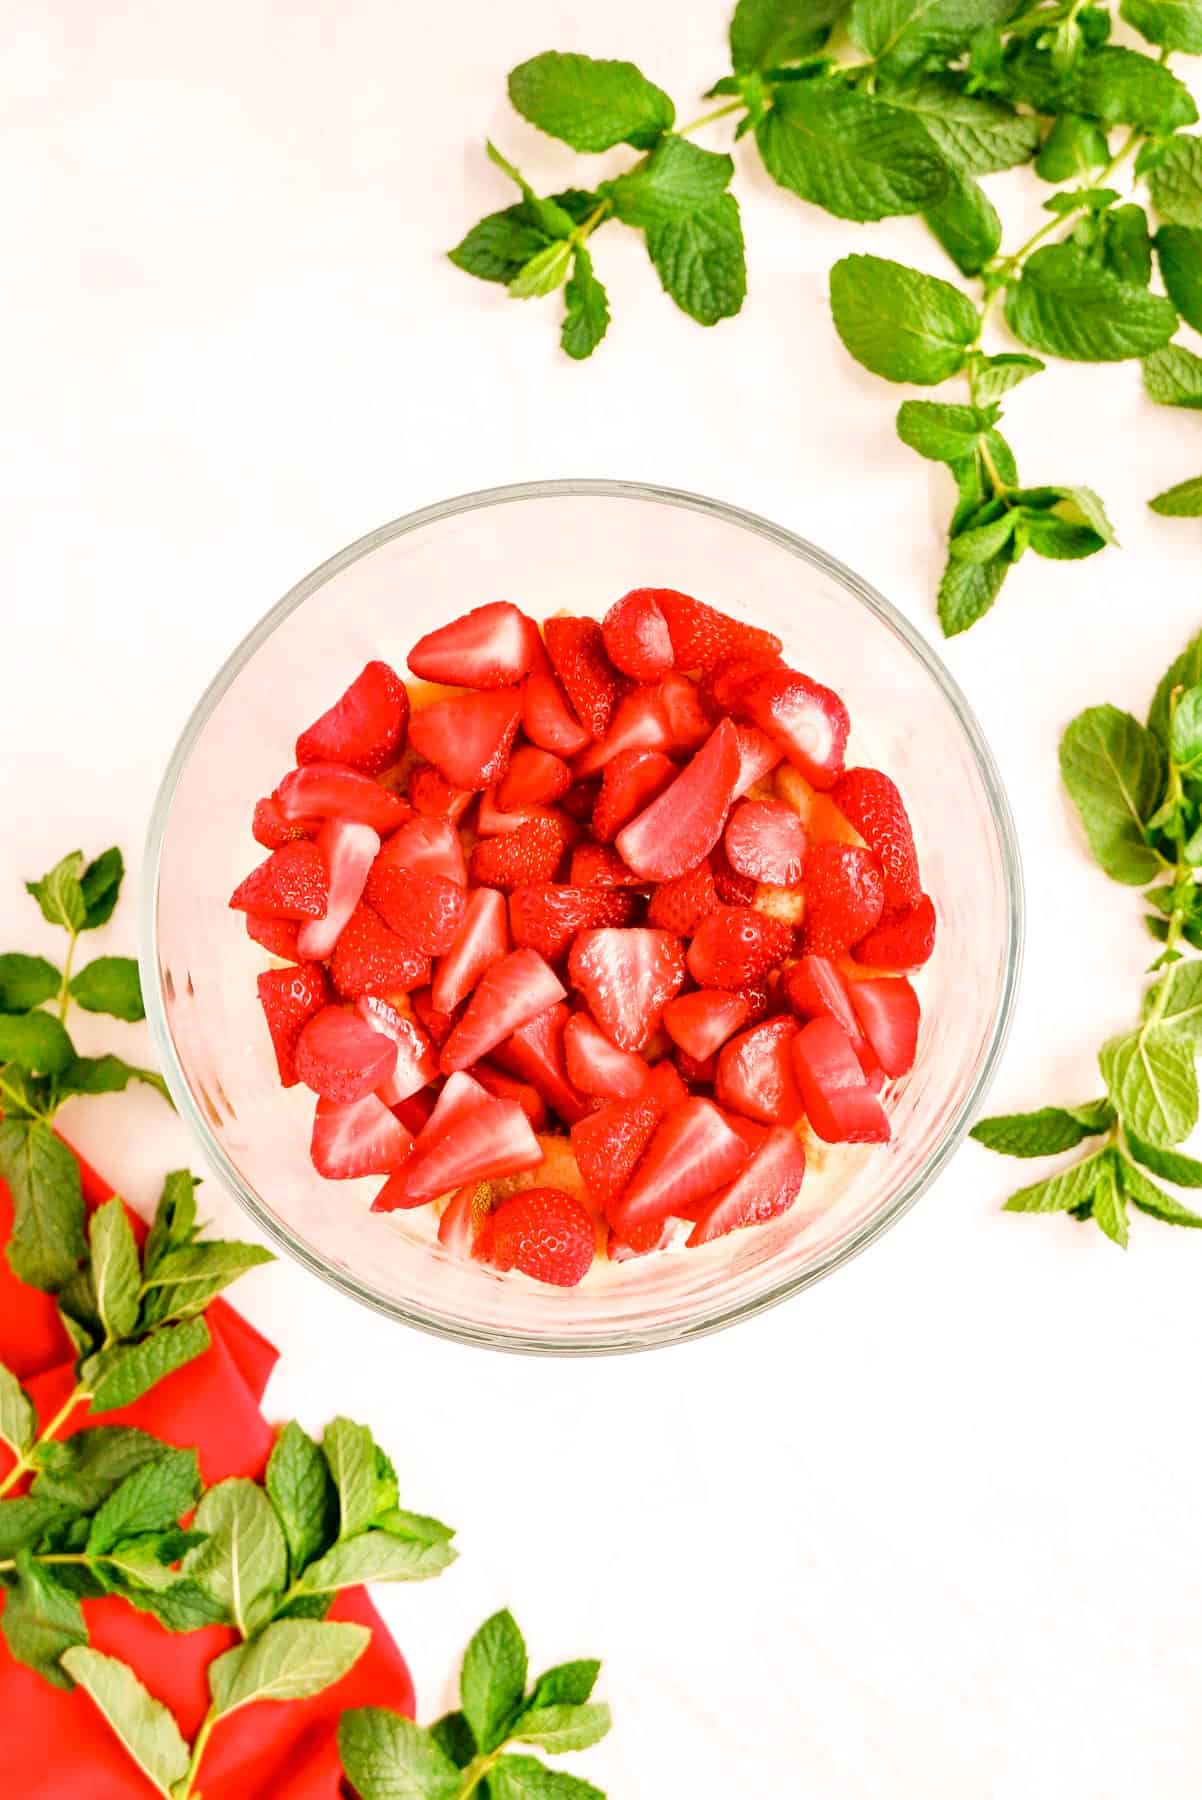
- Cut berries: wash and dry all strawberries. Reserve a few extra-pretty whole berries if you like for garnishing your trifle, then cut all the rest into halves or quarters (you want them to be bite-sized), then set aside.
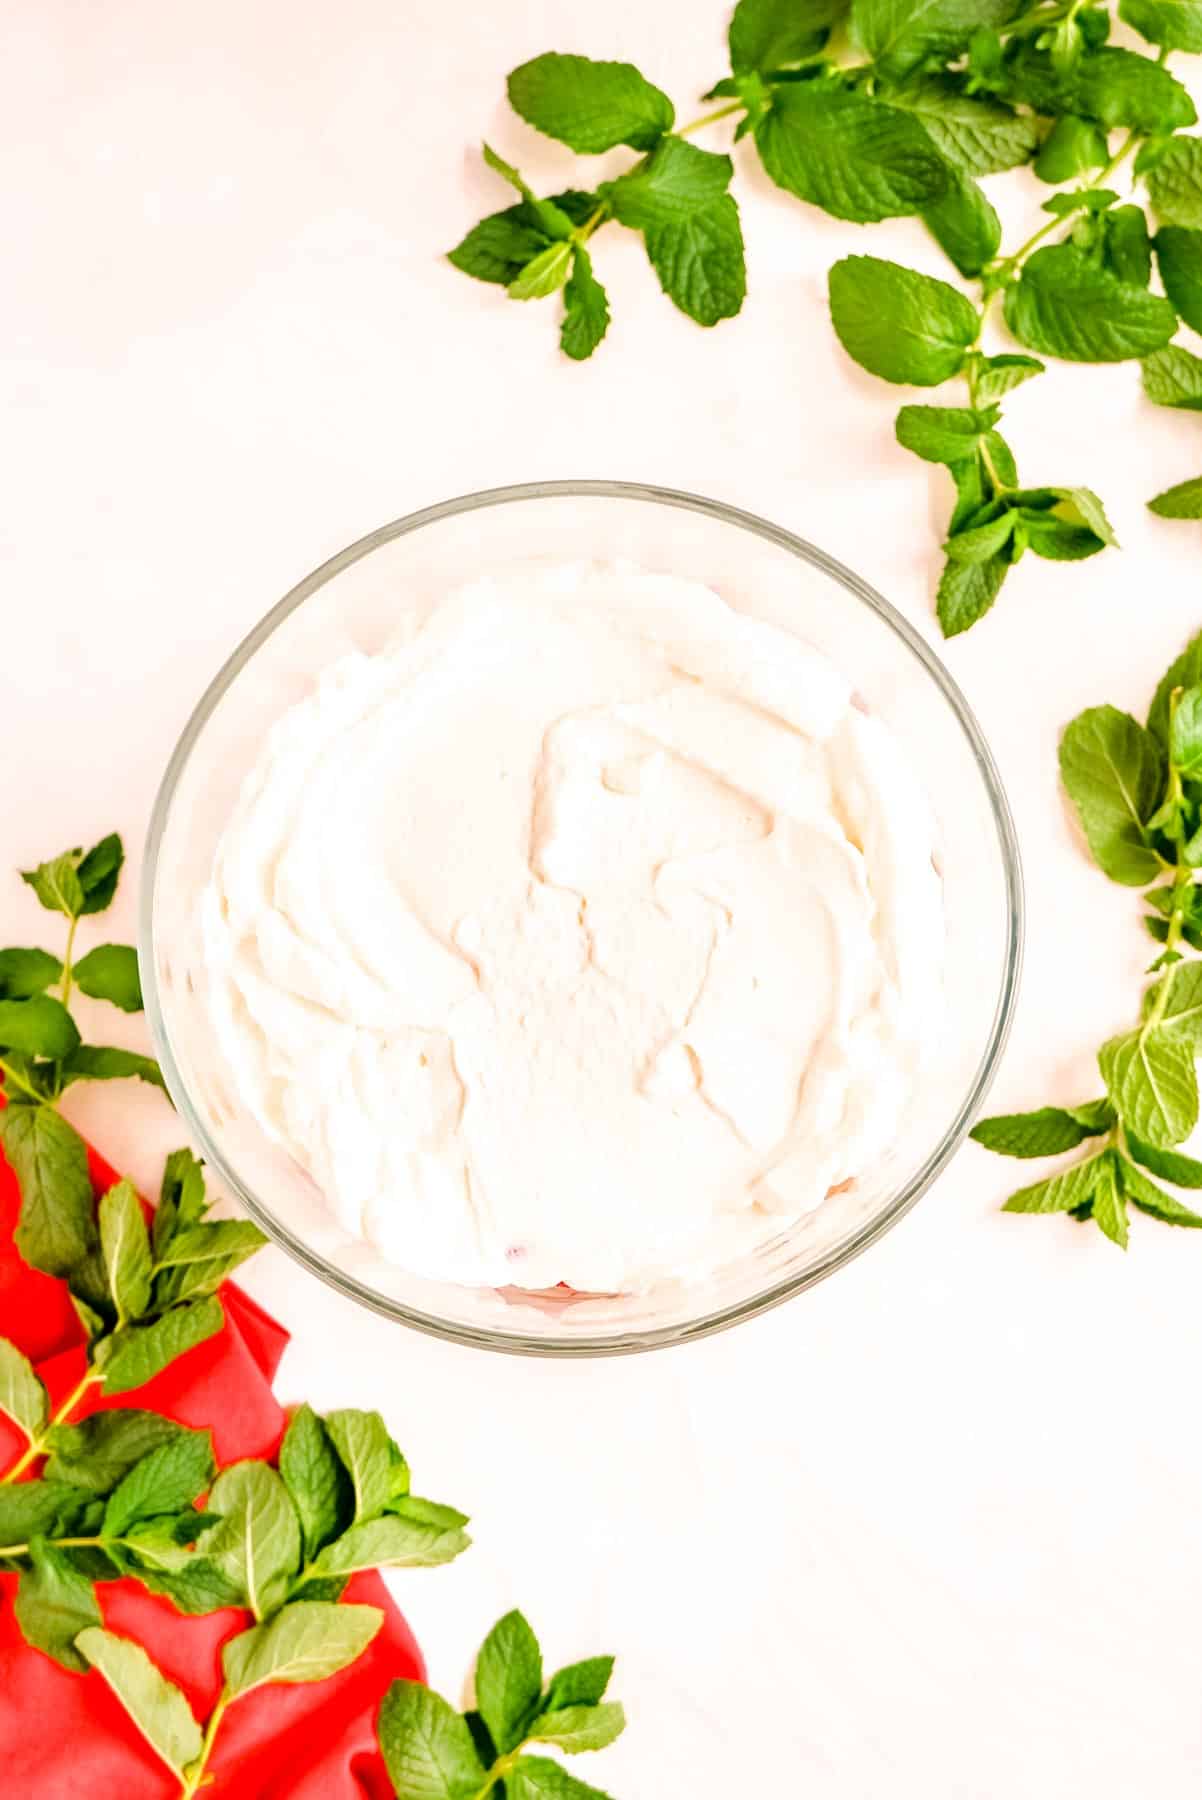
- Whip cream: combine heavy cream, powdered sugar, and vanilla extract in a medium sized bowl. Using a hand or stand mixer, mix on medium-high until the whipped cream reaches a thick and fluffy soft peak stage, and be careful not to over-mix (if your mixture starts to look grainy, you're about to turn your cream into butter so stop there!)
- Cube the cake: slice the soaked cake strips into cubes, about 1" squared.
TO BUILD THE TRIFLE:
- Start with cake: using a 8-10" traditional trifle dish, start to layer your ingredients by adding about half of your cake to the bottom of your dish in an even single layer. (Note: for best results assemble immediately before service).
- Then the berries: cover the cake with half the chopped strawberries.
- Top it with cream: dollop half of the whipped cream on top of the strawberries and spread it out into a solid layer.
- Repeat all three: add the second half of the cake in another layer, then the rest of the berries, and lastly, heap up the remaining whipped cream on top.
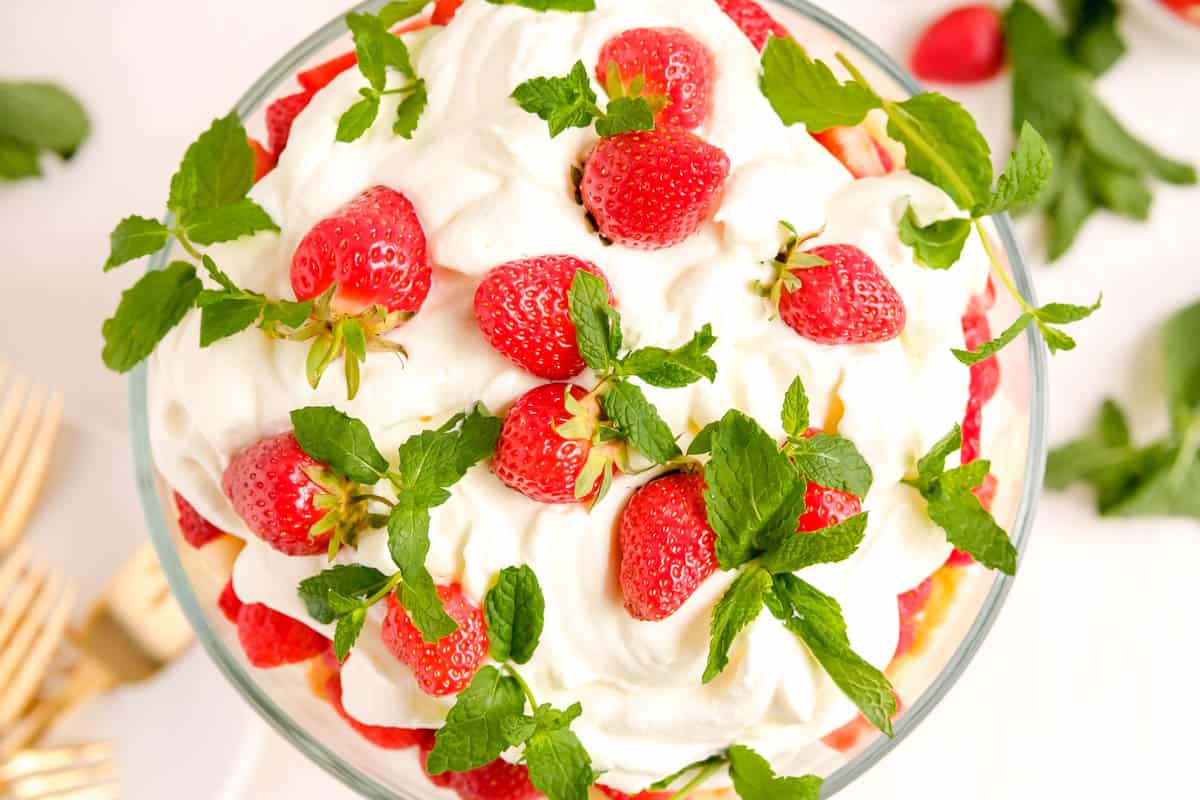
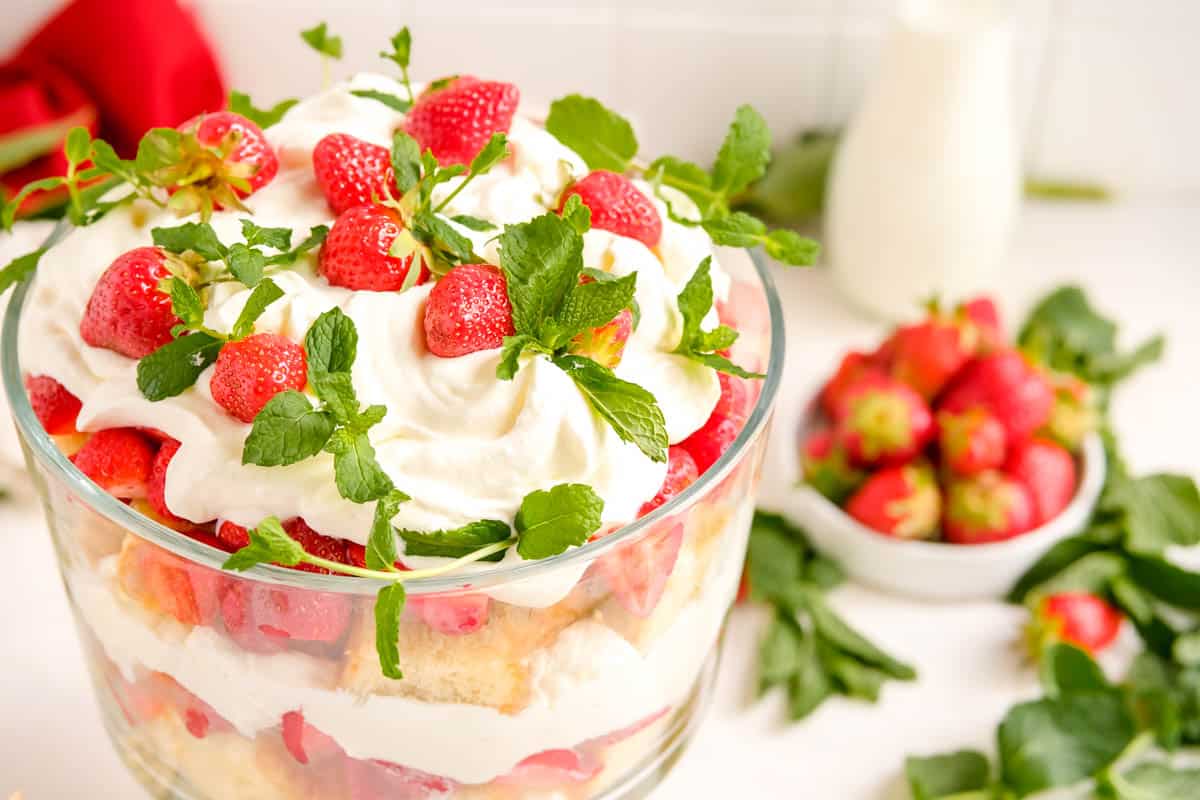
- Garnish and enjoy! Add whole, chopped, or fancy fanned strawberries on top of the whipped cream, and decorate with mint leaves as well if you like. To serve, scoop out a big spoonful of this fresh and fruity treat, and enjoy all the layers of delight with any and all loved-ones lucky enough to grab some before it's all gone!
Test Kitchen Tips
- "Optional" Mint Simple Syrup: while you definitely need a simple syrup with this drier traditional sponge, if you'd enjoy a more American-style yellow layer cake, then you can bake up our Easy Vanilla Sheet Cake, and skip the syrup all-together. You'll miss out on the fresh mint flavor, but it will still be super delicious, just with a more classic strawberry + vanilla profile!
- "Ribbon" Stage: to check if you've reached "ribbon stage" (usually after about 5 minutes of whipping here), stop the mixer and use the whip or a spatula to drop some of the mixture back onto its surface. You want the ribbon you're making to melt back into the mixture in the count of 3, but not much sooner. If it melts in much faster, keep whipping!
- Individual Servings: trifle is also a great option for cute individual desserts; anything clear from mason jars to wine glasses work great to show off all those pretty layers!
- A Classic Strawberry Trifle: if you prefer to make a more classic vanilla + strawberry trifle, you can just leave the mint leaves out of the syrup (see that recipe for details) and follow the rest of the recipe as written.
- Can this be made ahead? Because we're making fresh whipped cream instead of using store-bought with stabilizers, you'll want to whip the cream, and assemble your layers just before service. Leftovers can be stored air-tight in the fridge for up to 2 days (but again, trifle is best served fresh!).
Comments
No Comments