


I’ve already gone on quite a bit in the 101 + 102 lessons about how I’m a big proponent of measuring by weight. So, I think it’s about time I tell you why I love it so much! In this lesson, we’ll discuss all the benefits you can reap by using this system in your own everyday baking.
Jump to (scroll for more!):
Is it really better to weigh ingredients when baking?
While everyone's situation is unique, i would say that the majority of people will see better results when baking by weight instead of volume.
My chef instructors at pastry school drilled an OCD-esque habit of work station cleanliness into my head right from the start. So I like to have as few things as possible on the counter when I’m baking. They always said...
A messy station leads to a messy mind.
~Many a French Chef Instructor, although Chef Sebastien Canonne, M.O.F. might win the official citation for this golden nugget.
I’ve found this sentiment to be pretty darn accurate, and baking by weight is one of the easiest ways to keep your workspace nice and tidy!
The Pros of Measuring by Weight
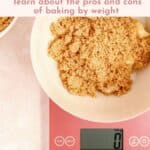
As you might have guessed, the pros of weight measurements are the reverse of the volumetric cons. In short, measuring by weight is significantly more accurate than measuring by volume, with much less room for human error, and far fewer dirty dishes.
The latter is one of my favorite benefits, to be honest. (I do a little happy dance anytime I find a way to have even one less dirty dish!)
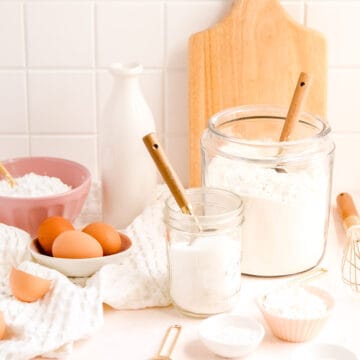
When measuring by weight, which most chefs call “scaling,” you can just keep adding ingredients to the same mixing bowl as you follow the recipe. This keeps clutter off your counter and makes the final clean up a breeze!
Pounds or Grams?
Some American bakers choose to work in pounds and ounces (I find this most common with bread bakers in particular). However, I was trained by European chefs and therefore prefer to use grams.
Since a gram is a very small unit of measurement (one gram = the weight of about one paper clip), it’s very precise. This is true whether you're measuring anything from baking powder to flour.
The more precise your ingredient measurements are, the more predictable and repeatable your results will be. This is especially important for anyone who uses baking in their professional lives.
Grams for the Win!
When using a scale instead of a measuring cup, your ingredients will come out to exactly the right amount for your recipe. Those measurement will be accurate within the weight of a paper clip or two!
This removes any manufacturing variation in the cup or spoon you’d otherwise use for measurement. It also negates the human error that inevitably comes into play when leveling, properly fluffing, or packing an ingredient. Eyeball estimations required when you don’t have the right size cup or spoon are also a thing of the past.
The Cons of Measuring by Weight
If I’m being honest, the biggest drawback of measuring by weight is the fact that it isn’t the standard system in the US.
Gram Scales
A gram scale is a mini scale used to measure your smallest amounts of ingredients.
Think of things like baking powder, baking soda, salt, extracts, etc. You usually need to use a different scale for these ingredients as larger scales used for flour and sugar can't detect the minute variations within a gram that you'll need to measure these ingredients accurately.
Now, using a gram scale to measure ingredients like baking powders and salts can seem a little annoying at first. The good news - you can always choose a hybrid method and use teaspoons and tablespoons for those ingredients!
Quick conversions?
However, there’s no quick and easy fix for all the recipes out there that you wish were written in grams, but alas, call for cups and teaspoons.
Over time, you’ll know the conversions of ingredients like flour, sugar, and milk by heart. You also can easily look up the odd ball additional weights. That said, there will always be that extra conversion step to figure out before you start baking.
Luckily, a recipe only has to be converted the first time you bake it, then you never have to do it again! To help you with this process, I’ll be putting together a weight conversion chart that you can print out and keep handy in your kitchen.
You can even find scales like this one that will do the conversion work for you! I actually use this scale myself if I'm in a hurry sometimes. While it's not perfect, for the majority of home bakers, it will yield as good if not better results using the volume "weights" as the traditional cups and spoons would.
Why Professionals Measure by Weight
As I mentioned above, all the professional kitchens I’ve ever worked in have used weight measurements.
In addition to cleanliness and accuracy, the flexibility that weight measurements offer is essential for professional bakers. The ability to produce any number of a particular product without being limited to fractions of a batch (ex. a full batch, a half batch, a double batch) affords chefs much more control over their product output.
This allows them to minimize waste, and even work around a particular ingredient restriction, if needed.
What to do with 7 tablespoons of butter...an anecdote
For example, say you have exactly 87% of the butter you need in order to make a batch of chocolate chip cookies. If you choose to measure that butter by weight rather than volume, you’ll find that you can still make your cookies without running to the store!
It’s not magic, it’s science…and a little bit of basic math.
Simply calculate a 0.87X batch of the recipe. In other words, make all your other ingredients match up to the amount of butter you have available.
This can be super helpful when you find yourself a little low on an ingredient. It's also a great option to have if you have an odd amount of an ingredient you’d like to totally use up because it expires soon.
The math used to make these conversions is very easy (I actually make my Excel recipe documents do it for me!). I’ll be sure to walk you through every step in a future post. But seriously, it’s a game changer for anyone looking to sell baked products on a larger scale.
The Short + The Sweet
So now that we know all the pros and the cons of both styles of measurement, let’s look at the best of both options, and see who might benefit from each:
Baking by VOLUME (cups and spoons)
- It’s the standard for home bakers in America, and thus familiar to just about everyone.
- Most recipes are written in these measurements.
- Allows for some equipment and human-based inaccuracy.
- Creates a messier workspace and more dirty dishes.
- Best for casual or occasional bakers, or developers who know their audience is only interested in recipes written in volume.
- I'll just note here that although I post volumetric recipes for my audience, I do still develop by weight for ease.
Baking by WEIGHT (ounces or grams)
- Not standard for home bakers in the US, but standard in other countries; you’ll see this reflected in British recipes, for example.
- Standard for professional kitchens in the US.
- Most recipes need to be converted to gram weights (but only once).
- Very accurate, producing consistent, predicable products.
- Minimizes work station mess and limits dirty dishes.
- Allows maximum flexibility for recipe resizing while maintaining accuracy.
- Allows maximum flexibility for sizing a recipe batch around a particular ingredient.
- Best for anyone baking professionally, especially selling physical products, or for frequent bakers (even if just for personal use) looking for a cleaner, faster, and more accurate way to bake.-

Hopefully with all those details in summary, you’re starting to envision yourself either as someone who can feel confident staying in the world of cups and spoons, or as someone who might benefit by jumping into the world of kitchen scales.
As you'll see in my recipes, I like to provide a hybrid ingredient list. While I'd love to just stick to weights for all the reasons listed above, I know many of you may prefer to use volume. So, I'll always list both options and you can choose whichever you feel most comfortable with!
Currently Preheating…
In our next two lessons on measuring, I’ll discuss best practices for both methods so you can ensure unbeatable results for your baked treats, no matter how you measure!

Ready to learn more and put all your new skills to good use?
Check out my newest tutorials and recipes below, and get to baking!
This website contains Amazon affiliate program links. This means that I earn a small commission on qualifying purchases at no additional cost to you. I will never provide a link to nor recommend any product or service that I don’t genuinely love or personally use. Thank you for supporting MINT + MALLOW kitchen and the brands that keep this blog running.


Comments
No Comments