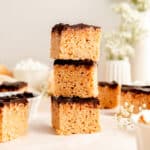
Rice Krispie Peanut Butter Bars (with chocolate ganache!)
These peanut butter bars with chocolate ganache are an easy, no bake treat, combining an old-fashioned recipe with a new flavor combo!
Servings: 24 bars
Ingredients
FOR THE GANACHE:
- ½ cup heavy cream
- 1 ⅓ cups dark chocolate chips*1
FOR THE PEANUT BUTTER BARS:
- 12 ounces Rice Krispies Cereal 1 box
- 30 ounces mini marshmallows 3 bags
- ½ cup (1 stick) unsalted butter
- 1 cup smooth peanut butter
- 1 tablespoon vanilla extract
Instructions
TO MAKE THE GANACHE:
- Add ingredients to a microwave-safe bowl: add chocolate and cream to a microwave-safe glass pitcher or bowl with plenty of room to stir.
- Microwave Round 1: microwave bowl for 45 seconds on 50% power. Stir briefly to blend with a fork or whisk (chocolate will only be a little melted).
- Microwave Round 2: microwave for 30 seconds at 50% power. Stir vigorously for at least 30 seconds until liquid and chocolate come together into a smooth, shiny, uniform glaze. (It works best to start stirring only in the center of the bowl, and then as you see the ingredients combining, start widening your stirs out to the edge of the bowl.)
- Microwave Round 3 (optional): if any chocolate chunks still remain after a really good mixing, continue microwaving in 15-second intervals at 50% power, stirring well after each round until all chocolate has fully melted.
- Chill: place ganache in the fridge to thicken slightly for 15-20 minutes until it reaches a spreadable texture while you work on making the Krispies. (Be careful you don’t leave it in the fridge for too long or it will really thicken up in which case you can use 15 second, 50% power microwave rounds to thin it back out).
TO MAKE THE BARS:
- Prep everything: using baking spray, grease your largest mixing bowl, your largest spatula, and a 9" by 13" pan very thoroughly.*2
- Set up your workspace: pour the rice krispies into the large greased bowl. Set your greased spatula with your bowl, have your 9"x13" greased pan within reach, and set a hot pad or cooling rack next to your bowl that you can set your hot marshmallow pan on. (Once the marshmallows melt, everything will set quickly so you want to make sure all your tools are ready to go!)
- Melt butter and peanut butter: over medium heat, melt the butter and peanut butter together in a large pan (big enough to fit all the marshmallows), stirring frequently to blend.
- Stir in vanilla: once the butter and peanut butter are melted, stir in the vanilla extract.
- Melt marshmallows: right after adding the vanilla, dump in the half the marshmallows and stir/fold them into the peanut butter mix. Add the second half and fold them into the peanut butter goo as well until all the marshmallow are evenly coated. Continue stirring constantly until all the marshmallows are fully melted and the mixture is smooth. If the marshmallows on the bottom of the pot start to brown at any point, just turn the heat down.
- Move to your work station: once smooth, take your pot over to your pot holder or cooling rack and switch out your cooking utensil for the greased spatula.
- Mix marshmallows with krispies: pour melted marshmallows over rice cereal and use the greased spatula to fold them together quickly, until no dry pockets of cereal remain. (Be sure to get to the bottom of the bowl where the marshmallow puddles and you can smear the clumps back and forth to mix them if needed. And be careful - the marshmallows are really hot!)
- Transfer quickly to pan: immediately scrape all of the krispie mixture into the prepared pan. Gently press it down into all the corners and flatten the top (you don't need to press down too firmly though or it'll make your krispies a little tough). You can do this with a spatula, or I even put a good deal of baking spray right on my hands and then use my hands to press the bars down into the pan and up against all the sides and corners too.
- Cool, then add ganache: allow Krispies to cool to room temp (about 30 minutes), and remove ganache from the fridge and just leave it at room temp as well to make sure it doesn’t get too stiff. Once Krispies are cooled, give ganache a brief stir, then pour it overtop of your treats and spread it into an even layer.
- Allow ganache to set then enjoy! Allow ganache to set up for at least an hour, then cut bars to your desired size right in the pan, and take a deliciously *krispie* bite of the chocolate + peanut butter goodness!
Notes
- 1Dark or milk chocolate? Thick or Thin?: because these Krispies are pretty sweet, I like to use dark chocolate to bring a bittersweet note to these bars. That said, you’re welcome to use semi-sweet or milk chocolate, but just know that the thickness of your ganache will vary depending on the chocolate you choose (it even differs between various qualities of dark chocolate). If you would like your ganache to be thicker before adding it to your bars, feel free to chill it longer. If you feel like the texture is thick enough right after mixing it up, feel free to skip the chill altogether.
- *2Grease it up good: it's important to grease the full bottom and the sides of the pan, and if you don't think you have a bowl big enough to mix in (you need to fit the full cereal box and 3 bags of marshmallows in it), you can use a roasting pan or even a large pot - whatever you have on hand that's big and can safely hold that hot marshmallow goo!
- Microwave strength: the times listed in this recipe were what worked for my microwave, which is 1150 watts. If your microwave has a higher wattage, your ganache may be fully melted faster, and if it has lower wattage, you may need a few extra 15 second intervals to fully melt everything.
- Don’t combine cook times! I know it's tempting to just add all the times together for the few microwave rounds, but you must resist! If you blast your chocolate for too long in one round, or use it at full power, the chocolate will burn, and then you'll have to throw away that batch and start over.
- Big marshmallows: if you only have big marshmallows, cut them into at least halves if not quarters (I find just snipping them into pieces with kitchen scissors works well). Know it'll take a while for the bigger marshmallows to melt (but they will!) so just be patient, and keep stirring over low heat throughout the melting process to prevent burning.
- Pan resizing: these bars are designed to be very tall and thick, because there's something about that oversize nature that makes me feel like they’re an extra special treat. However, if you'd like to make your Krispie treats thinner, you could make a half batch and put it in the same 9” x 13” pan. Your other choice would be to use a bigger pan (like a 10” x 15”) and still make the full recipe. If you're happy to have those nice thick bars, but just want a smaller batch size, then you're welcome to use an 8” or 9” square pan instead for a half recipe of these bars.
Nutrition
Serving: 1 bar | Calories: 337kcal | Carbohydrates: 49g | Protein: 5g | Fat: 15g | Saturated Fat: 8g | Polyunsaturated Fat: 2g | Monounsaturated Fat: 4g | Trans Fat: 1g | Cholesterol: 16mg | Sodium: 192mg | Potassium: 150mg | Fiber: 1g | Sugar: 27g | Vitamin A: 1135IU | Vitamin C: 9mg | Calcium: 42mg | Iron: 5mg
Did you try this recipe?
It’d mean so much to me if you could please give the recipe card a ⭐ rating on the site and leave a comment to help others find this sweet recipe! Xo, Jocelyn @ Mint+Mallow